BEDKNOBS & BAUBLES

  • Interiors
    • My Home: Main Bathroom
    • My Home: Powder Room
    • My Home: Living Room
    • My Home: Dining Room
    • My Home: Main Bedroom
    • My Home: Front Porch
  • Lifestyle
  • Travel
    • Travel Posts
    • Travel Guides
  • Style
    • Style Posts
    • Outfits
    • The Coveted
  • Collaborate
  • About

Home Update: Siding Work & We Removed A Door!

October 27, 2022 by jessica Leave a Comment

Sources: Mailbox (similar) | Sconces | Storm Door | Welcome Mat

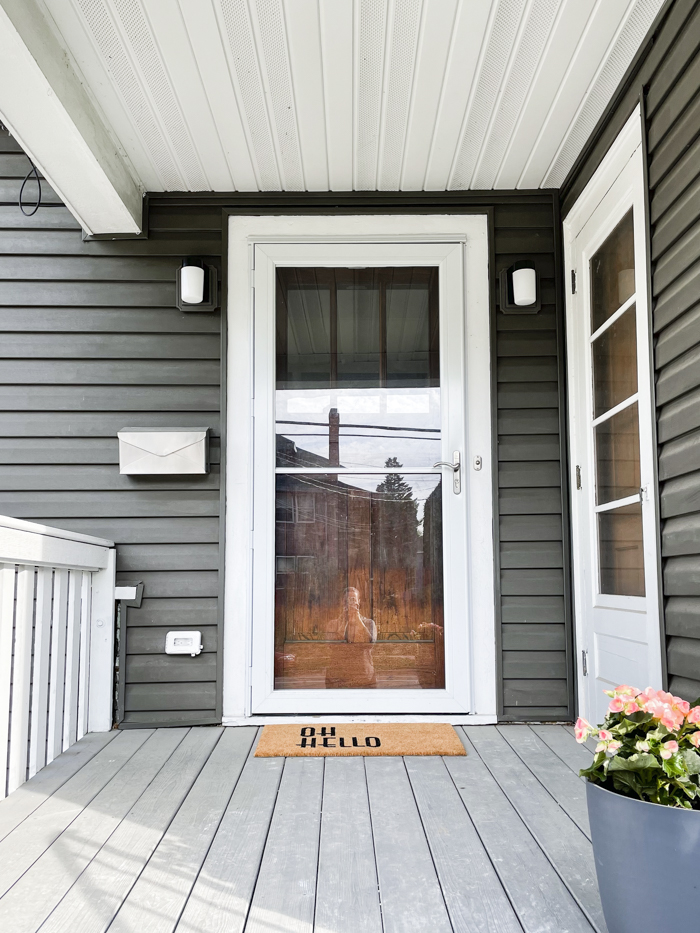
While a full bathroom remodel this year was incredibly exciting, the smaller improvements around the house are just as satisfying and deserve fanfare! Our latest update happened this Tuesday when we finally removed the inoperable door on our front porch.

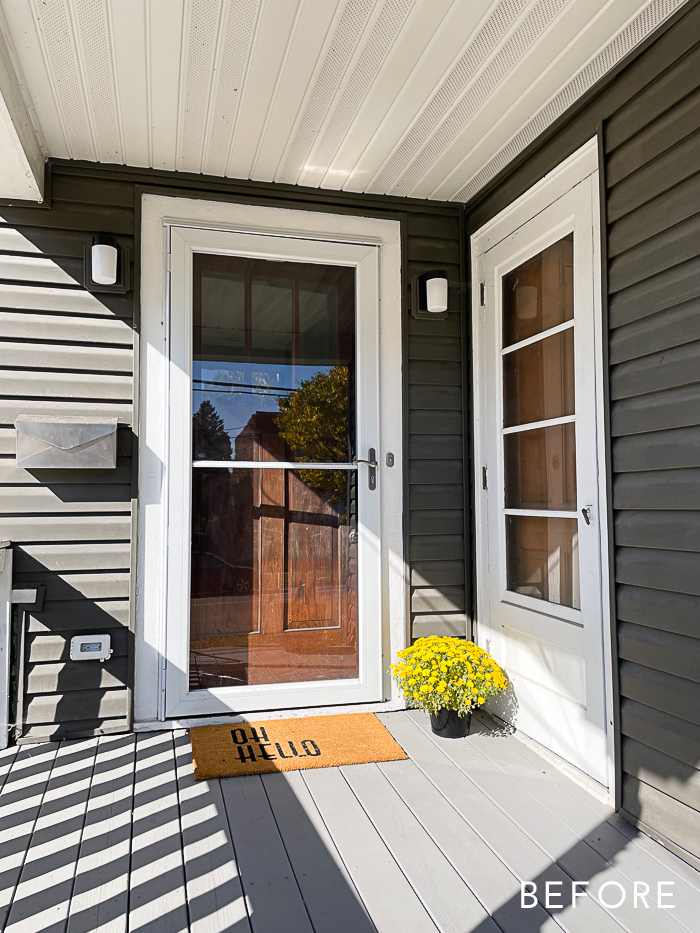
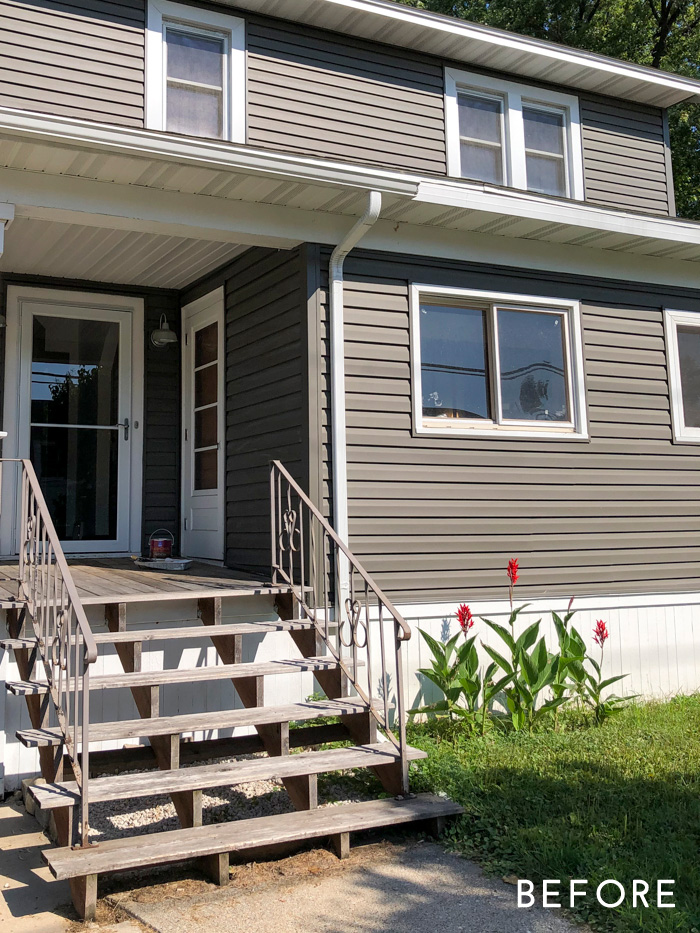
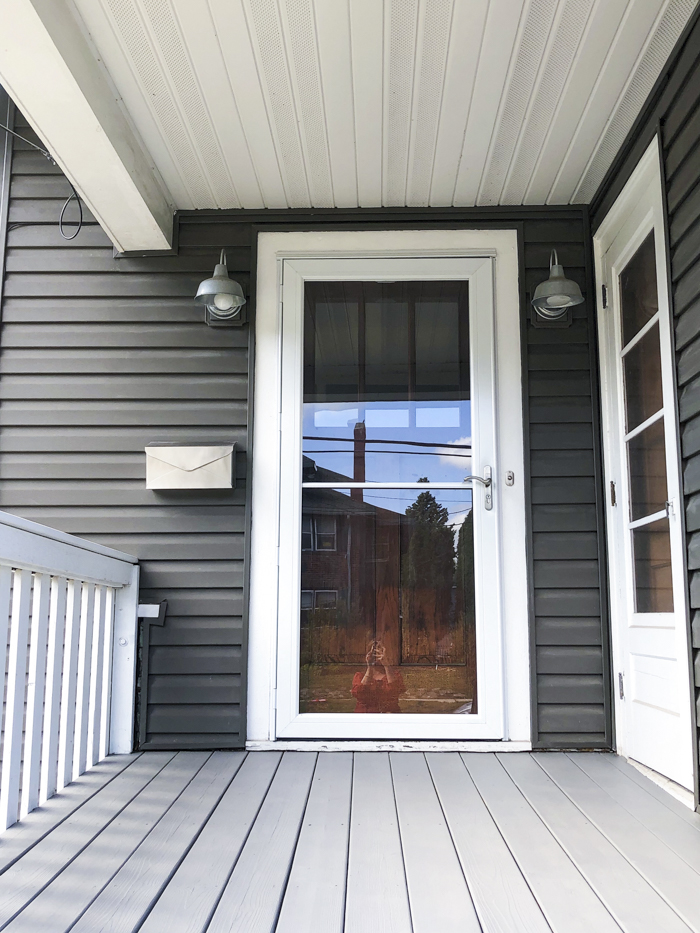
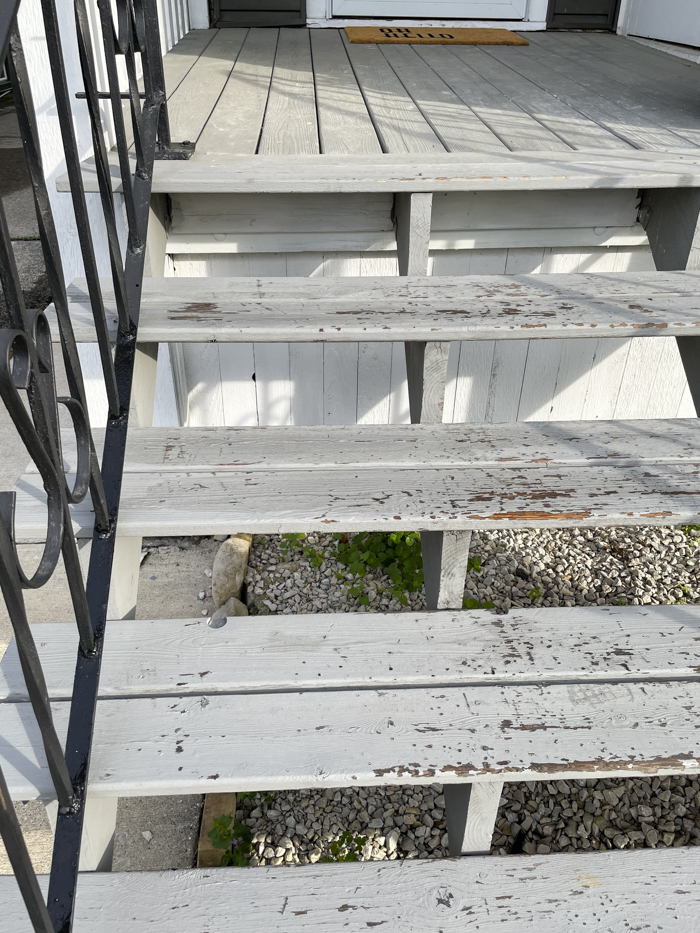
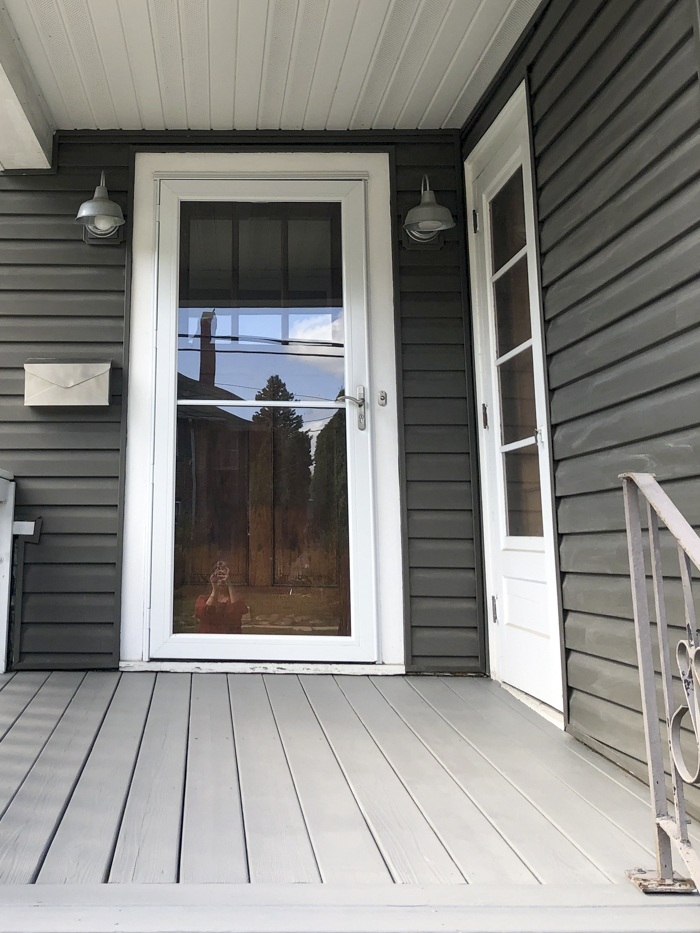
As you may recall, this is what we were working with. For some background, our house was built in 1929 and would have originally had a porch to the right of the entry. Our neighbor has lived next door since he was a child and remembers that the space had double-hung windows all along the front of the house until the 1990s when George, a previous owner, decided to close it all up and reduce the window count to just two ugly block windows: one of them is plexiglass and the exterior framing on them doesn’t even match. The window situation is clearly an expensive problem for another day. (Thanks, George.) Our pressing annoyance was that door and since I don’t want a window in that spot, we decided to have it filled in now as we tend to have drafts leak through the gaps and insects making their way in for the winter.

A challenge that we ran into with hiring a siding company is that many don’t take on smaller jobs unless they did the work to begin with — even though we had piles of extra siding in our garage. Fortunately, our neighbor recalled that the siding was done by the person we bought the house from and he was gracious enough to dig through his records to find the company’s information for me. (This is precisely why I’ve started a home binder with things like contact information for tradespeople and paint colors that I can hand off to the next owner.)

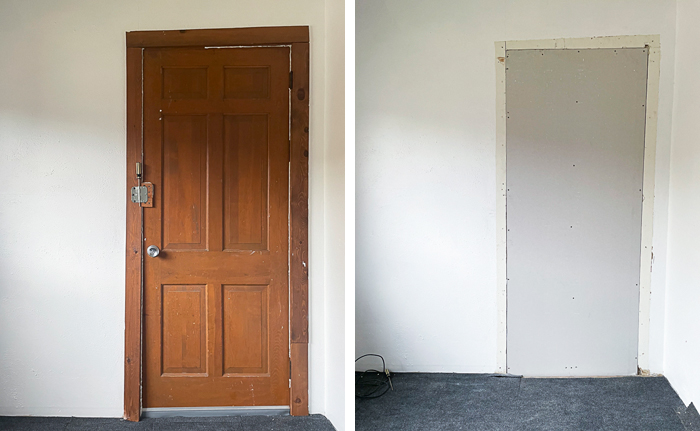
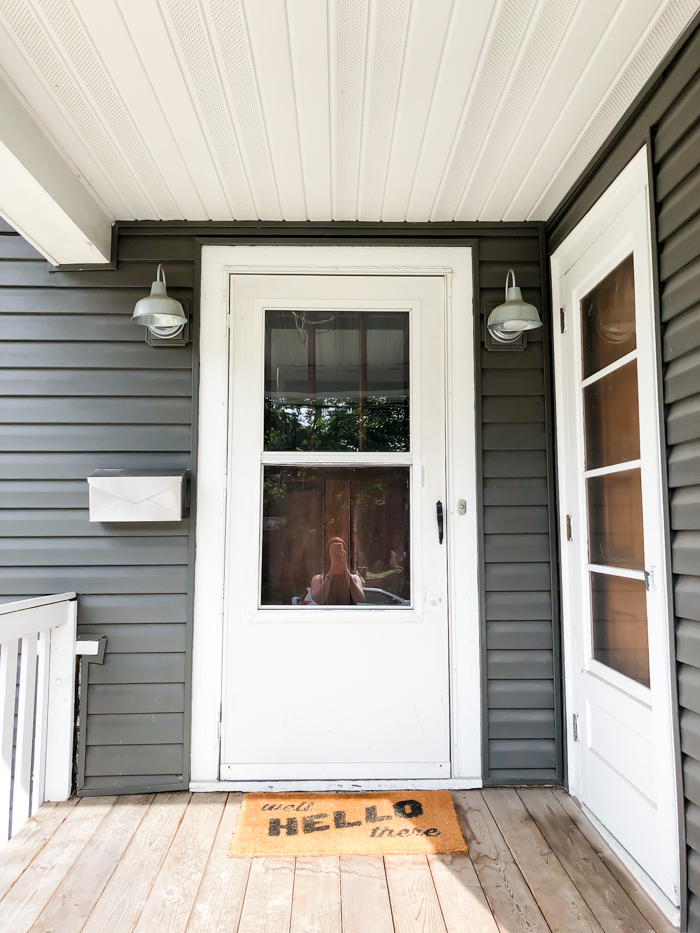
The company we hired framed in the gap, insulated it, added the siding, and put up drywall on the interior side. They don’t do interior work, so I’ll be trying my hand at taping, mudding, and sanding this down the road. I don’t feel pressured to do a great job, since this will all be redone at some point when we invest in revamping this space. It’s a huge improvement over that janky door, though, and that posh screwdriver-through-hinge locking system.

Left: The “Before-Before” shortly after closing on the house, and mounting the mailbox. Right: Where we are today.

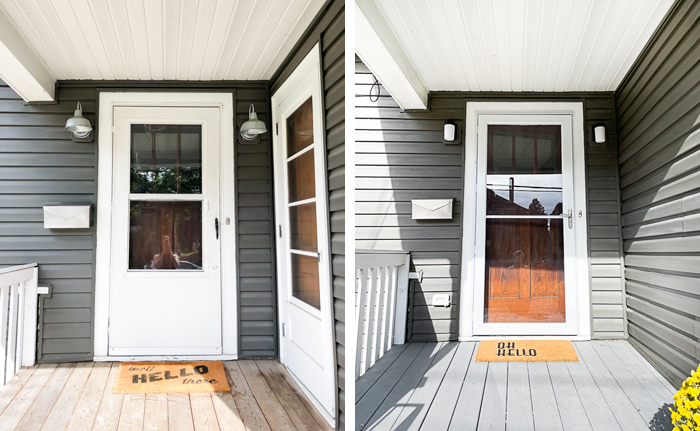
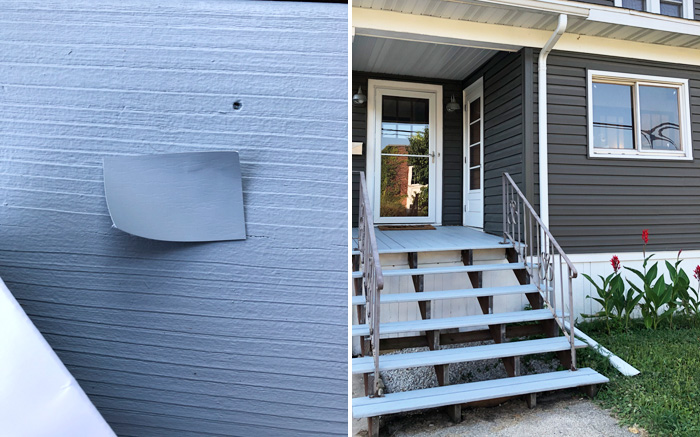
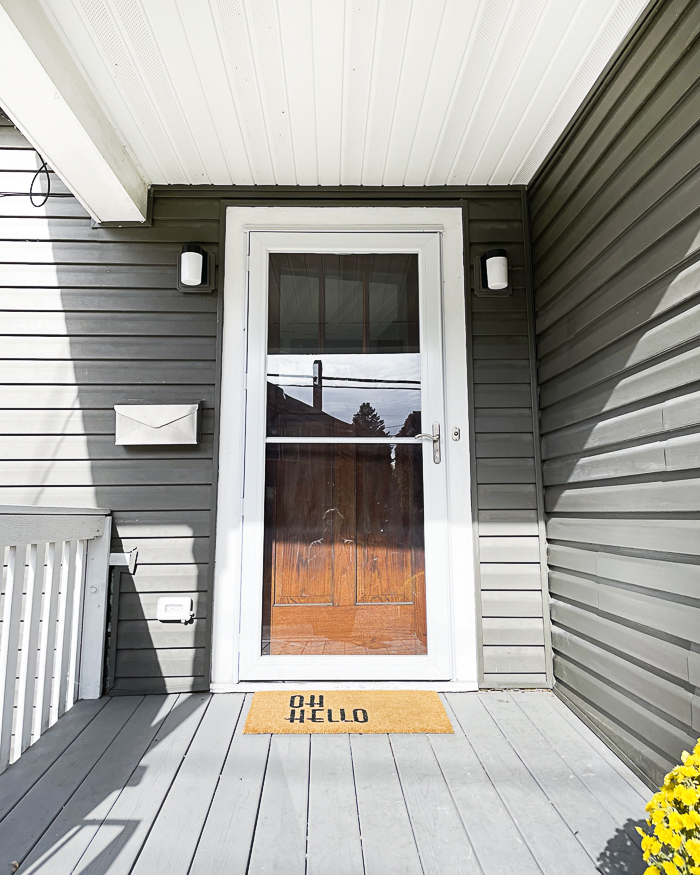
The team took down all of the siding on the right side and rehung it with some of the long pieces we had in the garage, so there isn’t an obvious patch. You’d never know the door was there!

More posts about the front porch:

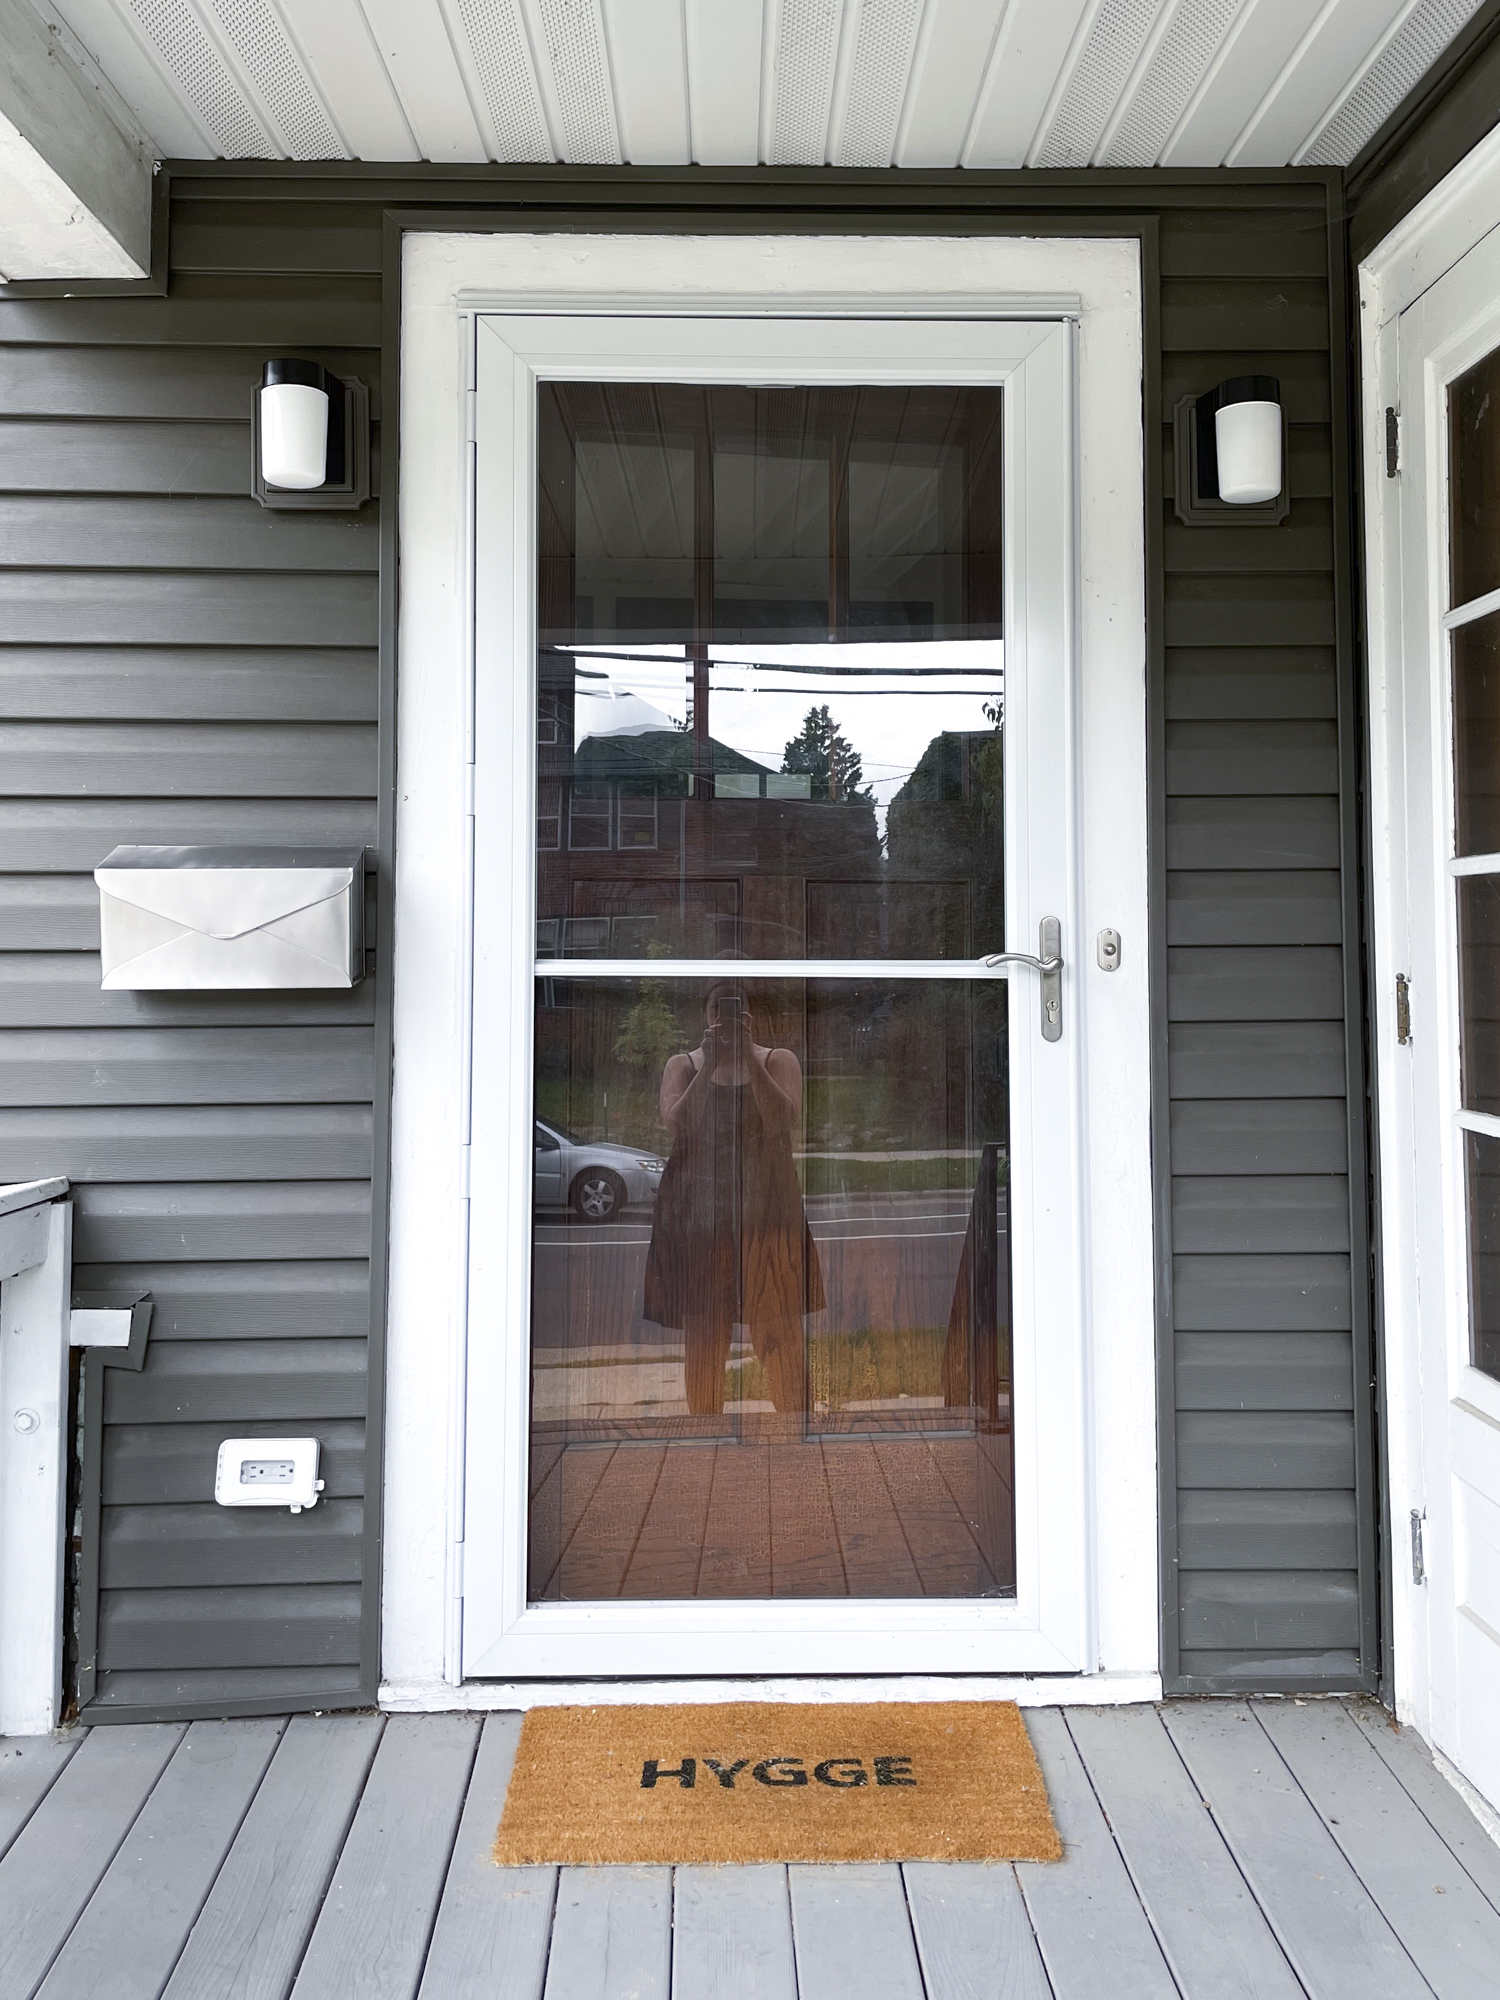
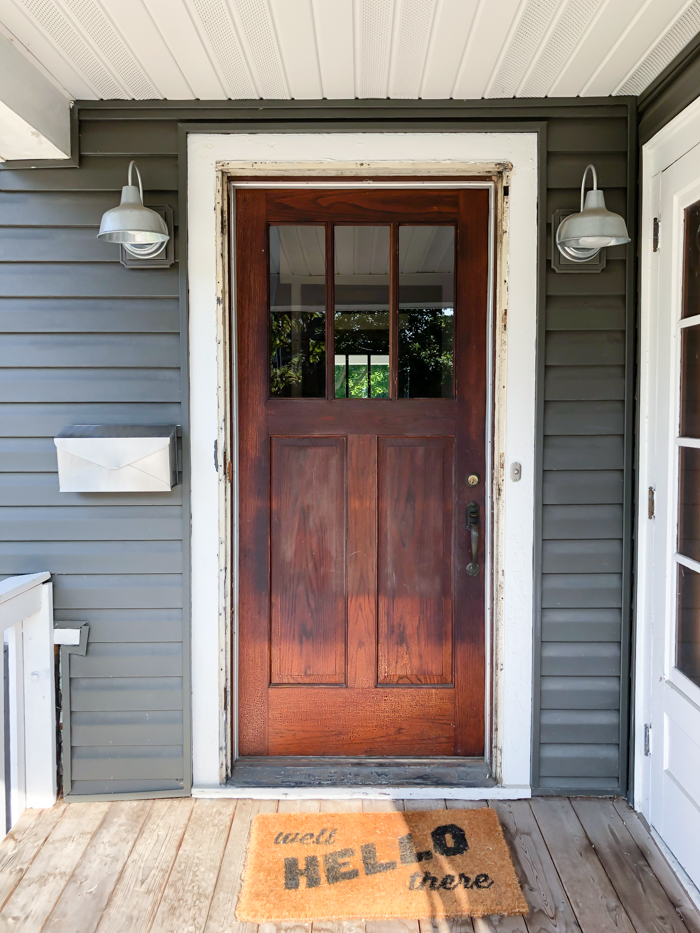
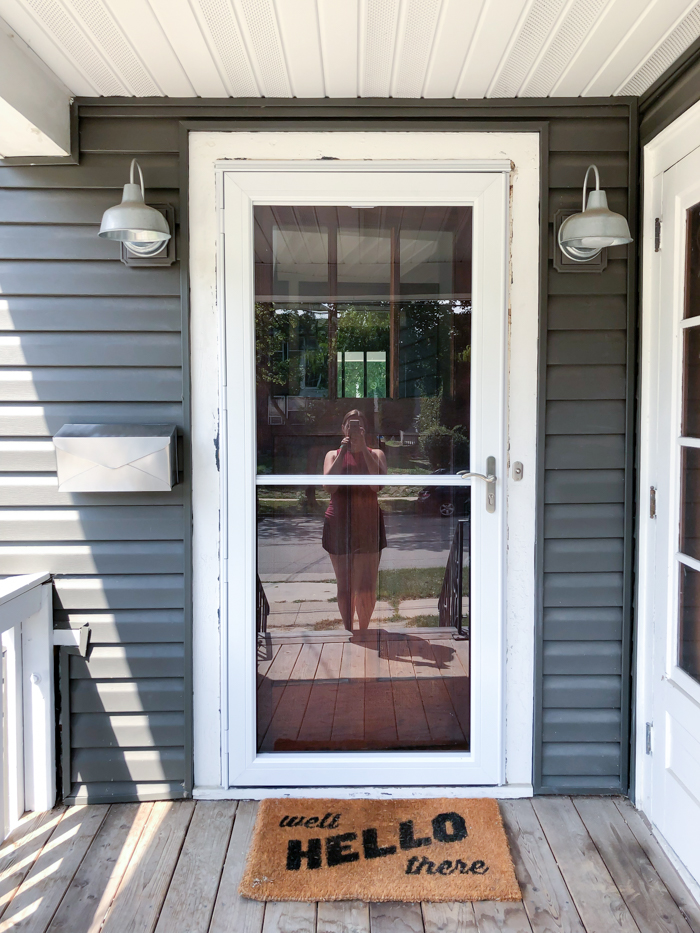
  • Replacing the storm door
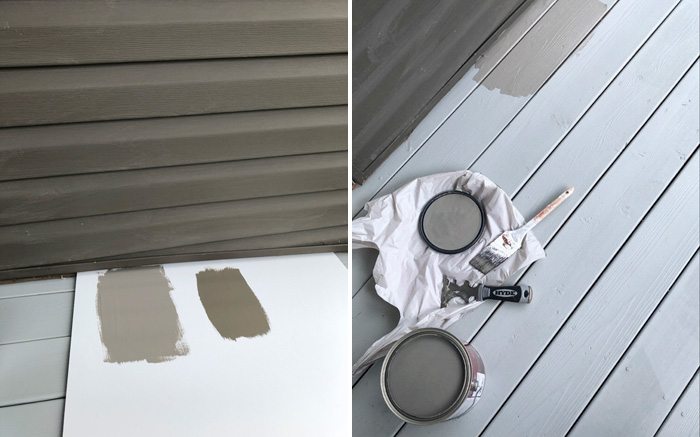
  • Staining the flooring with Sherwin Williams’ SuperDeck
  • How the stain held up two years later
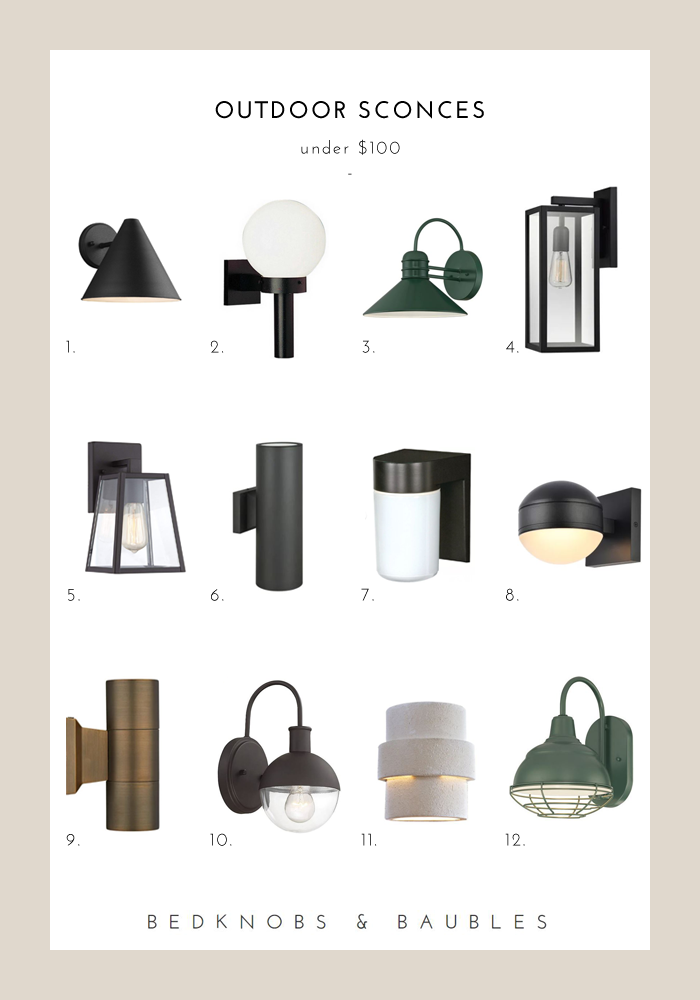
  • Swapping out the sconces + 12 options under $100

Additionally, we had to address the exterior of our bathroom’s shower window. During our remodel, we reduced the size of the existing window (which you can see here). Our contractor ran into the aforementioned issue of siding companies turning down the work because we weren’t sure who had done it originally. Apparently the metal framing around the windows is impossible to do without the proper tools that our contractor would have to rent — and, I’ll be honest, since siding wasn’t their area of expertise, we decided it’d likely be cheaper to have an actual siding company do it eventually. Our contractor insulated the area below and put up the waterproof board at the bottom of our new window. We had him paint it black, which made it look like a regular window from far away and that’s what we lived with for the last five months.

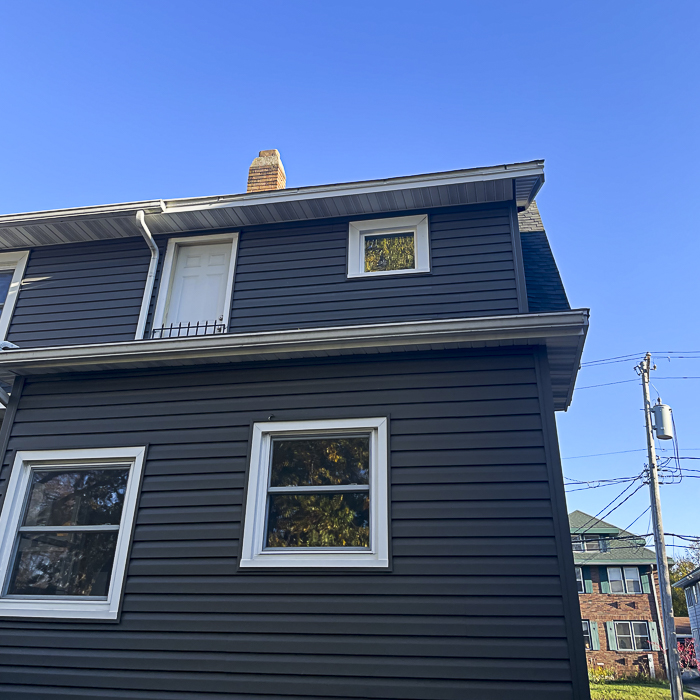
And, here it is now! They really did such a wonderful job to make sure that the patching work was disguised. All in, the project cost $2,800, which I thought was reasonable.

If you’re wondering about that door up there, it’s from when the house was a two-flat and stairs led up to it. We had to install a permanent barrier in front for insurance reasons and found a gate that could be screwed in, but easily removed when we embark on that ordeal. The joys of an old house and correcting someone else’s choices, huh?

–
Let’s keep in touch!
Instagram / Facebook / Pinterest / Bloglovin’

Thanks for visiting! As a reminder, I may earn an affiliate commission if you buy an item through my links. This is at no cost to you. I appreciate your continued support!

Filed Under: Front Porch, Home Tagged With: Front Porch, home renovation

Two Years Later: How Sherwin Williams SuperDeck Stain is Holding Up

June 1, 2022 by jessica Leave a Comment

We stained our front porch two years ago with Sherwin Williams SuperDeck stain in Wet Clay. Now that it’s been a couple of years, I wanted to give you an update on how it looks after being walked on and exposed to harsh Wisconsin winters.

Progress Report: Front Porch

To refresh your memory, here’s where we started. I had painted the bottom of our house white the week we moved in, but that was initially raw wood as well. I had toyed with the idea of painting the stairs, but had conflicting input from people as to whether stain or paint was the better option — and then I gave up entirely on this project and focused my attention to the interior as I only had so much bandwidth for house projects! Eventually I decided on the best of both world: a solid deck stain.

(I also painted the railings black that summer. I used Rust-Oleum rusty metal primer and the brand’s protective enamel in a satin finish.)

Sherwin Williams SuperDeck Wet Clay

Here’s what it looked like right after staining it. Click here for the full post — and to see the awful color I tried first.

And here are some unedited photos of where we are after two years:

(Note: It rained the night before I took these photos, so the wood is darker than it usually is after a dry day.)

Clearly the treads have seen better days, but I do think the stain has held up pretty well considering it’s been through two winters with shovels scraping against the risers after each snowfall. The edges by the railing that don’t get walked on or shoveled have remained in good shape, as well as the porch floor that’s protected by the overhang.

In the next few weeks, I’m going to give the risers a quick sand and put a new coat of stain on. I can’t imagine it’ll take more than an hour of work, which is what I expected for a colored stain instead of going with a traditional wood stain.

Our bathroom contactor had his team cut some of the tile on the front porch when it was pouring out, so those white marks on the deck are actually tile dust that hasn’t been swept away by the wind. The stain color hasn’t faded.

Now that we’ve had the stain for two years, I do feel comfortable recommending it — so long as you’re aware that there will be maintenance to keep it looking great (which is something you’d have to with any paint or stain anyway). Let me know if you have questions! (And let me know if you have a recommendation for a good power washer. Our house needs it!)

Sources: storm door | outdoor sconces | mailbox (sold out, but I love this one) | welcome mat | planter |  doorbell | Sherwin-Williams SuperDeck opaque stain in Wet Clay

–
Let’s keep in touch!
Instagram / Facebook / Pinterest / Bloglovin’

This post contains affiliate links.

Filed Under: Front Porch, Home Tagged With: Front Porch, home renovation

Progress Report: New Outdoor Sconces & 12 Options Under $100

October 6, 2021 by jessica Leave a Comment

I feel a little embarrassed posting this photo since our house is in desperate need of a power wash — but, I like documenting our progress. So, today’s post is about the small-but-necessary updates we’ve made to our front porch recently: new sconces and an outdoor outlet!

The outdoor outlet is definitely an eyesore, but it’s a small price to pay to be able to hang Christmas lights outside. I had been using these socket adapters with our old sconces and they’re great in a pinch, but an outdoor outlet is really a necessary upgrade. We have an outlet on the interior side of this wall in the same spot, making it the easiest placement for the outlet. I would have preferred to have it less obvious, but it doesn’t really bother me that much. I’ll put a potted plant in front of it next year.

The more exciting change was swapping out the old sconces. As a reminder, this is what we were starting with:

Sherwin Williams SuperDeck Wet Clay

I don’t mind the farmhouse shape of those sconces, but they didn’t work with our aesthetic. Beyond that, they were flimsy and were starting to rust. (I don’t know about you, but rusting electrical fixtures don’t give me peace of mind.) You’ll also notice that the canopy is circular and the siding trim behind it is a rectangle. There’s an overhang, so I don’t think much moisture made its way in, but it was a haven for insects. We had a hornet nest under the one on the right, which was thankfully abandoned when we took down the fixture.

My main priority for a new sconce was one with a rectangular canopy that would fit within the existing trim. I have the biggest crush on this sconce from Schoolhouse, but the canopy wouldn’t work and, well, $300 per sconce simply isn’t in our budget with an upcoming bathroom renovation. (We have two sconces in front and one over our back patio door.) I strongly considered this one from Rejuvenation, but after measuring the sconce plus the globe, I discovered that the top of the globe would be in line with the very top of the door and that seemed too high. I eventually came across these. Are they my favorite sconce? Not by any stretch of the imagination. However, the canopy was correct, the size was spot on, and the price at $40 each was enticing enough to place an order. I figured I could always return them if I hated them. They ended up being far better quality than I expected for the price. (It’s also worth noting that we did not want a light with an integrated LED; we wanted to use our own smart bulbs to set the automation.)

Since I’ve done a lot of sconce-searching over the past few months, I thought I’d put together a roundup of outdoor sconces under $100:

ONE | TWO | THREE | FOUR | FIVE | SIX | SEVEN | EIGHT | NINE | TEN | ELEVEN | TWELVE

–
Let’s keep in touch!
Instagram / Facebook / Pinterest / Bloglovin’

This post contains affiliate links.

Filed Under: Front Porch, Home, Interiors Tagged With: Front Porch, home renovation, lighting, Renovation

We stained the front porch!

August 28, 2020 by jessica Leave a Comment

Sherwin Williams SuperDeck Wet Clay

You may remember last year’s front porch project when we replaced our screen door. And, now, we’re another step closer to completing the front porch now that we’ve stained the floor!

The process wasn’t without its frustrations, though, as you’ll see below. But first, let’s start with a before photo of the front of our house. (Side note: you’ll notice that the siding looks different in just about every photo depending on the light. The most true color is what you see above. It’s also in desperate need of a powerwash.)

Two year update: See how the stain held up here!

Progress Report: Front Porch

Okay, so this isn’t a real before image when the entire bottom portion of the house was unpainted wood and we still had the old storm door, but this gives you an idea of what we’re working with. Ultimately, we’d like to give our house a full face lift. The original front porch that went along the front of the house had been closed off years ago. We’d like to add more windows (vertical, double-hung) to give the home more appropriate historic curb appeal. Plus, that door to the right is permanently sealed. It would have led to the porch at some point. We need to have that removed and scrounge up enough siding remnants to close it in from the outside. Whenever we’re able to do this, we’ll redo the front stairs entirely. They’re someone’s DIY project and they’re not even deep enough for kickboards. But, as with everything, these lofty plans cost a lot of money and we needed to do something to make it cuter in the meantime.

We had left the wood raw for the last three years as we hemmed and hawed over the the pros and cons of paint versus stain. I preferred the opacity of paint, but everyone seemed to be pushing us toward stain because of its durability. It wasn’t until earlier this summer that I discovered that Sherwin-Williams carries an opaque stain, which is the best of both worlds!

I was a bit cavalier about my selection of colors, holding up the color chips to the siding and went with my first impulse: Gray Birch. From the sample, it seemed to be a warm, light gray. Clearly, I wrong:

There were so many blue undertones to this stain that it appeared baby blue next to the color of our siding. I probably should have stopped earlier, but I kept wondering if it would dry differently or that I’d like it if I really gave it a fair shot. Instead, I hated it more and more. At one point, I thought I ordered the wrong color and peeled the chip off the card to hold against the applied stain. A perfect match. It’s just that blue.

(P.S. We’d eventually stain those stair risers when we figured out the right color.)

Sherwin-Williams SuperDeck Wet Clay vs. Flagstone

After that fiasco, I had about a half-gallon left and talked to Sherwin-Williams to see how I should proceed. They told me that the wood could really only hold one more coat of stain before it would just chip off and ruin the integrity of the product. They stained it deeper, getting closer to the King’s Canyon color and gave me a paint stick dipped in the hue to hold up against the house. That ended up having purple undertones, so I switched gears entirely and picked a new area of the color chart to try, opting for Wet Clay (above, left) and Flagstone. (They weren’t able to do samples of these in stain, but were able to give me paint to use on a piece of poster board to check against the house.) These colors had more yellow to the base and ended up being really great options. (Let that be a lesson to you to always get samples first!) I went with Wet Clay and the second coat of applied stain completely covered the first without any hints of color coming through.

Note: I’m unable to find the Wet Clay stain color on the Sherwin-Williams website. The color code is SW 3083.

Sherwin Williams SuperDeck Wet Clay

I am so happy with how it turned out! I can’t speak to the durability of the color until we get through a Wisconsin winter, but I did try to chip at it with my fingernail and it held tight.

Two year update: See how the stain held up here!

So, next on the list is doing something about those iron railings (might replace, might just spray paint them matte black with Rust-Oleum), touching up the white paint, and replacing the sconces. In full disclosure, I don’t mind the shape of the sconces, but they are so incredibly flimsy and cheap — and they’re starting to rust.

Sources: Andersen storm door | CB2 mailbox (also love this one) | House of Antique Hardware doorbell | Sherwin-Williams SuperDeck opaque stain in Wet Clay

–
Let’s keep in touch!
Instagram / Facebook / Pinterest / Bloglovin’

Filed Under: Front Porch, Home Tagged With: Front Porch, home renovation

Progress Report: Front Porch

September 4, 2019 by jessica Leave a Comment

Front Porch Progress

If you’ve seen my Insta story, you’ll know that I’m exceedingly proud of the progress we made on our front porch over the weekend. And, since those stories are fleeting, I wanted to be better about documenting progress on the blog. The pressure to post a “before” image followed by a beautiful “after” photo is real, but when you’re not a full-time blogger, it’s unrealistic to wait until everything is complete to celebrate success! Plus, I do think there’s value in showing that house projects take time and there will be plenty of “in-between” moments as you prioritize other things. So, here we are with a series of iPhone photos and athletic wear!

Obviously the door you’re looking at is our front door and opens into the entry. Our living room is to the right and the stairs to the second floor are on your left. The door on the right goes to what was an original porch that extended along the front of the house. We never use that door and will eventually be closing it off when we do a remodel of the exterior to add more windows and transform the dingy space into a functional sun room. (I’ve been using that space for painting projects and will take proper photos once I clear it out.)

Front Porch Progress

Replacing our storm door had been at the top of to-do list all summer, but we kept putting it because it seemed intimidating. One of our friends insisted that it wasn’t too bad, so we ordered a new door and hoped for the best. Then Dave’s dad offered to help and we took him up on his gracious offer.

I’ll admit that the door doesn’t look terrible in the photos, but that’s a lie. This door was flimsy, had paint that had worn off, had remains of duct tape that I could never remove, and a weird and non-functional chain at the top. I could have painted it and added a new door handle, but really, it was time to replace it with something modern. Plus, I wanted a screen. I’m not sure if this door ever had one? If it did, it certainly wasn’t left with the house and was probably misplaced decades ago.

Front Porch Progress

Removing the old door went a lot faster than I thought it would. The screws had been painted over and I figured it would be a bear to deal with. It wasn’t. But, oof, you can really see how rough the original door is in the sunlight. Honestly, it’s a gorgeous door, but it’s in need of TLC. There are dried spots thanks to sun exposure and the original varnish is cracking. Eventually I’d like to have it stripped and restained, but it’s so not on the top of my to do list. I’m torn on whether or not to polish the brass door handle since the patina is beautiful. (I’m sure no one has ever done it in the house’s 90-year history.)

Front Porch Progress

I was so proud of this “after” photo on Monday, even if you can see all of the paint that was scraped away when we removed the existing caulk. I would have painted when the storm door was off had I realized that the new door frame wouldn’t extend as far over the trim as the original door did. So, keep that in mind if you’re ever replacing a storm door. Take it off earlier than you plan to install the new one and add a fresh coat of paint before the new one goes on. It would have been much easier at that point.

Front Porch Progress

And here we are after a fresh coat of paint! The actual door removal and installation took about two hours and taping and painting took another hour. I think it makes the front porch look so much more inviting and I’m sorry that I waited so long to do it in the first place!

This fall, I’d like to stain or paint the floor (probably dark grey) and replace the light fixtures. The fixtures look okay in photos, but they’re such poor quality. They’re flimsy and, ugh, I just hate them so much. I’d like something in brushed nickle to match the other hardware outside.

Sources: Andersen storm door | West Elm door mat (also love this one) | CB2 mailbox (also love this one) | House of Antique Hardware doorbell

–
Let’s keep in touch!
Instagram | Facebook | Pinterest | Bloglovin’

Filed Under: Front Porch, Home Tagged With: Front Porch, home renovation

Hello!


Jessica Hamm
Hello there! I'm a first-time homeowner updating a 1920s house in Madison, Wisconsin. I have a penchant for travel and a love of costume jewelry.

Keep In Touch

  • Bloglovin
  • Email
  • Facebook
  • Instagram
  • Pinterest
  • Twitter

Search

Latest Home Finds

Visit Me on Instagram!

I’m challenging myself to get through a backlog I’m challenging myself to get through a backlog of travel photos before we book our next trip. First up, photos of the gothic York Minster. I’m not religious in the slightest but I can’t resist stunning architecture and the opportunity to climb hundreds of cathedral stairs for a city view. This one only had a single rest stop about halfway up the flight of 275 steps for a closeup view of the flying buttresses — and a waiver you had to sign before your ascent to promise you’re healthy enough to make it.
Can you hear meow? 😸 Lily is putting the phone Can you hear meow? 😸 Lily is putting the phone nook to good use.
Christmassy mornings. Christmassy mornings.
Thanksgiving Bake: Flourless Chocolate Wave Cake f Thanksgiving Bake: Flourless Chocolate Wave Cake from Dessert Person by @csaffitz

#dessertperson #thanksgiving #eastfork #eastforkdoesmydishes #eastforkpottery #dansk #food52 #dessert
Visiting York earlier this month put us in the Hal Visiting York earlier this month put us in the Halloween spirit. While it claims to be the most haunted place in Europe and is dubbed the city of a thousand ghosts, we only encountered the wire-mesh sculptures of Ghosts in the Gardens (@the_york_bid) and the family of souvenir ghosts I brought home from @yorkghostmerchants. 

#ghostsinthegardens #york #hauntedyork #yorkmuseumgardens #yorkghostmerchants
Instagram post 18062569012742534 Instagram post 18062569012742534
Load More... Follow on Instagram

Copyright © 2025 · Jennifer on Genesis Framework · WordPress · Log in