BEDKNOBS & BAUBLES

  • Interiors
    • My Home: Main Bathroom
    • My Home: Powder Room
    • My Home: Living Room
    • My Home: Dining Room
    • My Home: Main Bedroom
    • My Home: Front Porch
  • Lifestyle
  • Travel
    • Travel Posts
    • Travel Guides
  • Style
    • Style Posts
    • Outfits
    • The Coveted
  • Collaborate
  • About

Pretty, Useful Things: Stylish Soap Dispensers

March 25, 2022 by jessica

12 Stylish Soap Dispensers

ONE | TWO | THREE | FOUR | FIVE | SIX | SEVEN | EIGHT | NINE | TEN | ELEVEN | TWELVE

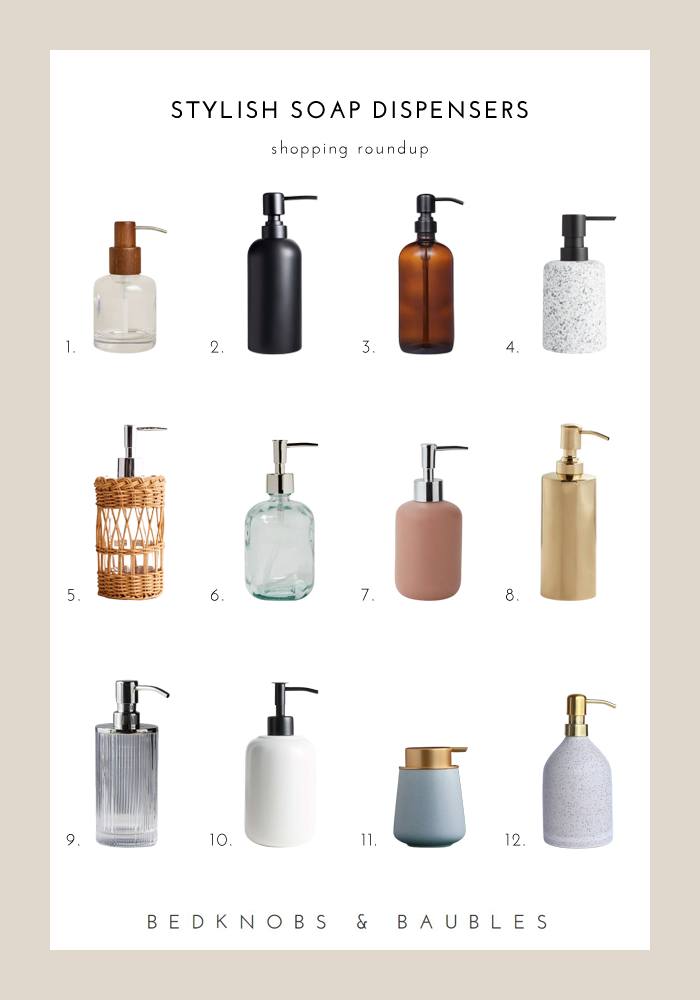
Fortunately I don’t suffer from decision paralysis because this renovation is one decision after another, and it’s everything from location of light switches and outlets to the size of the shower nook to the color of grout — and even to the accessories like soap dispensers. The soap dispensers I’ve had from Target haven’t really held up over the years, with exception of No. 6 above which is in our kitchen, so I’m on the hunt for new ones to outfit both bathrooms. Since I already have dozens of tabs open, I thought I’d share some of my favorites. Right now, I’m leaning toward No. 2 or No. 10 for our powder room. For the main bathroom, a glass version like No. 9 looks like it might be the perfect vintage-inspired choice.

–
Let’s keep in touch!
Instagram / Facebook / Pinterest / Bloglovin’

Filed Under: Home, Interiors, Shopping Guide Tagged With: Bathroom, bathroom accessories, pretty useful things, stylish soap dispensers

Project Update: Main Bathroom Progress

March 23, 2022 by jessica

sneakers

The team started on the upstairs bathroom last Monday. They’ve been making a lot of progress over the past week and a half, so I thought it was a good opportunity to share some photos of where we’re at.

First, let’s revisit where we started:

coat, top, jeans, bag, phone case

Once the bathroom cabinets were cleared out, Oliver couldn’t help but seize the opportunity to fully explore every nook and cranny of the room! I also snapped a few final before photos of the room in a widescreen format to give you a better idea of the layout. You can see additional before photos here, along with more details on what we’re planning on doing in this space.

This was the end of the first day of demo. The team needed to remove tile before they could remove the lath and plaster to bring the room down to the studs. You can see that we had some water damage where the tub was, but fortunately it was limited to the floors, wood we were removing, and insulation that would be coming out anyway. Apparently all of that insulation you can see in this image was wet. We’re incredibly lucky that the exterior wall and studs were all in good condition.

After tearing out the linoleum flooring, we discovered that our red oak floors had originally extended into the bathroom — as you can see in the opening image of this post. It’s a shame that the wood wasn’t in good shape and it had been patched in a few spots with plywood. I would have happily pivoted my design plans to have hardwood in here!

We also learned that our floors were hilariously uneven. Overall the subfloor was in good condition and they just needed to replace some of the subfloor that was next to the toilet due to some rot. After putting in the new board, they leveled the floor with various heights of materials to even it before installing the backer board for our future tile.

Here’s where we were at yesterday morning. We’re going to have two built-in cabinets flank the shower and they were able to frame the new one to match the original within an eighth of an inch in width. Also, removing that counter on the right side immediately added so much more room to the space.

The team is working on roughing in the tub and shower plumbing today. They’re also working on replacing the window that will be in the shower. We bought a new window that’s half the height, but the same width. This will allow us to keep the natural light that we love in there, but offers more privacy than that frosted window cling did. We chose a window that won’t open to ensure that the space remains watertight. We’ll be keeping the window at the left of this photo. It was important to me to save the original trim of the remaining window and the door, and we’re incredibly lucky that the old wood didn’t crack or break during demo.

This is one of my favorite additions: an electrical outlet inside the built-in cabinet! This is going to allow us to charge our toothbrushes in the cabinet and not on the counter! Seriously, if you’re doing a remodel of any sort, think of those ugly yet practical things that take up space and figure out a solution for them. Each contractor that we spoke with to get a quote thought this was brilliant and was going to suggest it to future clients. I should really get a commission. 😉

Clockwise from upper left: the wall where the vanity will go and progress on plumbing; our little home inspector; another look at the shower area; new insulation!

I’ll check in again once we’ve made more progress!

–
Let’s keep in touch!
Instagram / Facebook / Pinterest / Bloglovin’

Filed Under: Bathroom, Home, Main Bathroom Tagged With: Bathroom, Bathroom Remodel, Bathroom Renovation, Main Bathroom, renovation diaries

Powder Room Progress: The Tile is in!

March 18, 2022 by jessica

It’s been awhile since I’ve checked in! Our computer malfunctioned so I was MIA for a little while until we could get that back in working order and it couldn’t have come back at a better time when I have some updates to share with you from my last progress report on our powder room.

First things first, a peek of that easy-to-clean, flat-sided toilet was my most commented-on Instagram story ever. I love that we’re at the age where stuff like this excites us! If you’re the market for a toilet, you can find it here and here. I bought the recommended toilet seat for it.

Shortly after we left off, the drywall went up and it finally felt like a room again! We had a few days of mudding and sanding. In a perfect world, we would have primed and painted before the tile went in, but we had some scheduling delays that moved the tile up on the priority list. And trust me, I was not mad at it. Seeing the tile installed made my heart soar and I could finally see my vision board come together. It’s one thing to make a collage in Photoshop, but it’s another to see your selections actually take shape and work together.

It was around this point where I snuck downstairs and smugly smiled to myself thinking “I have good taste.” Haha. But it felt so good to see the pieces fall into place so well — and quite literally at that. You’ll see that we lucked out and were able to place a full tile at each corner and along the sides of the room. We did have a delay with the grout, so after the tile set in mortar, the floor was covered and attention moved to the walls and woodwork.

One of the things I really wanted to do in this space was make the millwork mimic that of the original trim in the house. They removed the frame and sill of the existing window in the half bath and rebuilt trim to match our window casings elsewhere. The window itself is pretty crappy and we’ll probably replace it down the road, but the new trim makes it seem so much larger and adds much-needed architectural detail in this space. The team still has some work to do with it to add a sill and a finishing piece over the seam, but I’m just so happy with it. They did a similar trim around the doorframe, and they put in baseboards that match the profile of our original trim on the first floor. (You can see these in the opening photo.) Our contractor’s team is so talented and they have such acute attention to detail that makes my perfectionist-heart sing!

The grout arrived on Friday of last week, which allowed the team to get that taken care of fairly quickly. This week was all about dehazing the grout, placing the finishing pieces like the trim, and starting to install fixtures. We still have to seal the floor and finalize locations of things like the mirrors and towel bars, but we’re getting there! The team also moved to the main bathroom on Monday and have already completed demo and leveled the floor. I’ll share more about that space in the coming weeks!

Until then, here’s a tiny peek at how far along this room has come. I’ll do a reveal post once we’re complete with a full source list.

–
Let’s keep in touch!
Instagram / Facebook / Pinterest / Bloglovin’

This post contains affiliate links.

Filed Under: Bathroom, Home, Interiors, Powder Room Tagged With: Bathroom, half bath, home renovation, powder room, progress report, renovation diaries

Powder Room Progress: The “Good Stuff” Isn’t the Pretty Stuff

February 25, 2022 by jessica

Interior blogs often focus on the pretty stuff — the “good stuff.” The stuff that comes after new drywall is placed and construction debris has long been cleared away. After beginning our own home renovations last week, I’ve come to realize that the pretty stuff isn’t the “good stuff.” The good stuff is the opportunity to improve your home’s mechanics, electrical, and plumbing to make a century home last another hundred years.

Before I tested positive for a COVID breakthrough infection and before our contractor’s crew began work, we estimated that our powder room would take two weeks from start to finish. That’s not quite how things actually went and I wanted to take a moment to document the progress we have made over the past couple of weeks. The crew did take a few days off from work over the past two weeks. There was an ice storm and a couple of the crew members that are on-deck weren’t comfortable with my COVID-positive status until I cleared the 10 days (can’t blame ’em). We’ll be at it full time starting Monday until both bathrooms are complete, barring any additional illnesses.

First up, here are some of the before images:

The powder room is off of the kitchen on the first floor. The kitchen and this powder room are both part of an addition to the house. Judging by the product selections, I’d guess this happened in the ’90s or early aughts. The room is approximately 25 square feet, which is a pretty decent size for a half bath, but the space wasn’t utilized effectively. When we started this project, we figured we’d keep the plumbing in the same locations — and for the most part that ended up being the case. It would be too pricey to move the toilet, even if it’s not in the ideal location for this space. That’s just a reality of renovations and budgets. The sink, as we came to learn was not correctly plumbed and would need to be moved. We’re going to center it with the door frame, so when you look into the room, you’ll see a pedestal sink, the mirror, and a sconce. You’ll still see that peek of the toilet seat, but eh, whatcha gonna do?

Here’s what we had when we opened up the walls. The pipe that ran to the sink was drilled through the floor, which apparently isn’t legal, and it wasn’t vented at all. The previous owner had also sealed an unused pipe with a wad of plastic. There was some minor water damage by the sink and toilet, which is to be expected. There was shockingly insufficient insulation on the exterior wall. And, of course, we had galvanized pipes. Replacing the pipes wasn’t part of the original scope of the project, but galvanized pipes can rust and crack over time. Having the walls already open is by far the best opportunity we’d have to proactively take care of a future problem. Our contractor said that it would cost another $500 to replace it all with modern PVC plumbing. The plumber was here longer than the half day that they anticipated, so I expect the final dollar amount to be higher. Still worth it because look at the grossness that’s inside of those pipes:

Ew. Haha. So, the thing with galvanized pipes is that they’ll rust on the inside of the pipe, too. The inside then becomes rough, making it more likely that hair and other gunk will get stuck leading to frequent clogs. And let me tell you, we are very familiar with this issue. Our upstairs shower connects to this plumbing and for the past four years we’ve lived here, we’ve been standing in ankle-deep water after a shower every single time. Snaking the pipes and Draino didn’t do much — it was a bigger problem that we are so grateful to have taken care of. You wouldn’t believe my excitement the first time I showered upstairs after the new pipes were in and the water drained like it should! I told our contractor later that it I didn’t know what kind of witchcraft the plumber did, but I’m a fan — to which he said “it’s the magic of PVC pipes.” Money well spent.

Here’s where we decided to move the sink. It’s a pedestal sink that will now be centered across from the doorway rather than being centered on the wall. This opens up space to the right where we can put a basket of towels or toilet paper. We’re also considering installing some floating corner shelves for plants.

You can see all of our beautiful new pipes and supply lines here — the real “good stuff.” Those remaining galvanized supply lines will be pulled when we’re working on the upstairs main bathroom. They’ve since insulated all of the hot water lines. (You can learn about the benefits of pipe insulation here.) There’s also new insulation in the exterior wall and the tile-ready subfloor has been laid. (And look at that bold red ceiling that used to be in the original galley kitchen! I had no idea!)

As you may recall from my product overview for the space, I had hoped we’d be able to add an inset medicine cabinet. Sadly, my dreams of having guests low-key snoop through my meds has been dashed. There isn’t any room in the walls to make an inset cabinet work and I’m not keen on the wall-mounted versions. I found this mirror on Overstock while I grumpily looked for an alternative. I had low expectations for it, despite the glowing reviews, but I forgot all about the medicine cabinet once the new mirror arrived. It’s hefty and well made and I just love it so much — plus it’s cheaper than the original one I wanted at just $130. It has the vintage-inspired look I was going for when paired with the sconce.

Even if the “good stuff” is the practical improvements, I’m still excited about the pretty stuff.

–
Let’s keep in touch!
Instagram / Facebook / Pinterest / Bloglovin’

This post contains affiliate links.

Filed Under: Bathroom, Home, Interiors, Powder Room Tagged With: Bathroom, home renovation, powder room, progress report, renovation diaries

Main Bathroom: Product Selections

February 11, 2022 by jessica

Drumroll, please… Here is the source list for our upcoming main bath remodel! (Scroll through the “before” tour here!) It feels amazing to see things come together after planning this renovation since August. Trust me when I say it’s been a lot of work to get this far. I didn’t think that I’d ever grow tired of shopping, but I think I’d ready to tuck my credit card away for a long while after this! I still need to buy an exhaust fan and a shower curtain rod, but those will be a cinch!

SOURCE LIST

Paint: Sherwin-Williams – Riverway
Wall Tile: 4″ x 12″ Subway Tile in White (tiling to the ceiling in the shower; midway up the wall throughout)
Mirror: Rejuvenation Yaquina Pivot Mirror
Sconce: Schoolhouse Electric Irvine
Sconce Shade: Schoolhouse Electric Straight Bell Shade
Vanity: Tile & Top 30″ Uptown Vanity
Shower Curtain: Target
Ceiling Light: Norwell Lighting (currently in the bathroom; might replace eventually)
Faucet: Delta Cassidy
Towel Bars: Moen Kingsley 18″ & Moen Kingsley Double Towel Bar
Toilet: Kohler Corbelle
Toilet Paper Holder: Moen Kingsley
Cabinet Knobs: House of Antique Hardware
Cabinet Hinges: House of Antique Hardware
Shower & Tub Kit: Delta Cassidy
Bathtub: Kohler Bellwether
Floor Tile: Marble Hexagon

The vanity was such a headache to figure out. I didn’t love much of what I saw online and I really didn’t want a composite material. So, we went to Marling Lumber, a local company that specializes in custom and semi-custom cabinetry. It was like pulling teeth to get information on our options from their sales person and after many trips to the showroom and many emails, we finally got a quote for a base with a solid surface top and one with a quartz remnant top. Those prices were $1,800 and $1,400 respectively, plus another $100 for an undermount sink. I’m fine spending more for the right piece, but those prices fest astronomical for what we were getting. It was back to the drawing board and the search functions at dozens of sites. We eventually found this one at Home Depot that ticked our boxes: solid wood for the majority of the piece (unfortunately we noticed that part of it is made from composite after reading reviews, but most of it is solid wood), storage, a real stone counter, and rectangular undermount sink.

It arrived a couple of weeks later on a pallet. We thought we’d be able to get it in the house with the help of Forearm Forklifts and were sorely mistaken. As luck would have it, one of our neighbors was outside and asked if we needed help. An emphatic yes from me! So, he and Dave hoisted the 125-pound package inside where it’s going to sit until the main bathroom work begins in March.

And here’s where I started last summer. I knew I wanted to keep the paint we already have in the room. I ordered those sconces when the project was just a glimmer in our eye, and I knew early on that I wanted marble hexagon tile on the floor and a longer-than-traditional subway tile. It’s so fun to see it come together and I’m beyond eager for the install!

–
Let’s keep in touch!
Instagram / Facebook / Pinterest / Bloglovin’

This post contains affiliate links.

Filed Under: Bathroom, Home, Main Bathroom Tagged With: Bathroom Renovation, Main Bathroom, Renovation

  • « Previous Page
  • 1
  • …
  • 4
  • 5
  • 6
  • 7
  • 8
  • …
  • 24
  • Next Page »

Hello!


Jessica Hamm
Hello there! I'm a first-time homeowner updating a 1920s house in Madison, Wisconsin. I have a penchant for travel and a love of costume jewelry.

Keep In Touch

  • Bloglovin
  • Email
  • Facebook
  • Instagram
  • Pinterest
  • Twitter

Search

Copyright © 2025 · Jennifer on Genesis Framework · WordPress · Log in