BEDKNOBS & BAUBLES

  • Interiors
    • My Home: Main Bathroom
    • My Home: Powder Room
    • My Home: Living Room
    • My Home: Dining Room
    • My Home: Main Bedroom
    • My Home: Front Porch
  • Lifestyle
  • Travel
    • Travel Posts
    • Travel Guides
  • Style
    • Style Posts
    • Outfits
    • The Coveted
  • Collaborate
  • About

Powder Room Progress: The Tile is in!

March 18, 2022 by jessica Leave a Comment

It’s been awhile since I’ve checked in! Our computer malfunctioned so I was MIA for a little while until we could get that back in working order and it couldn’t have come back at a better time when I have some updates to share with you from my last progress report on our powder room.

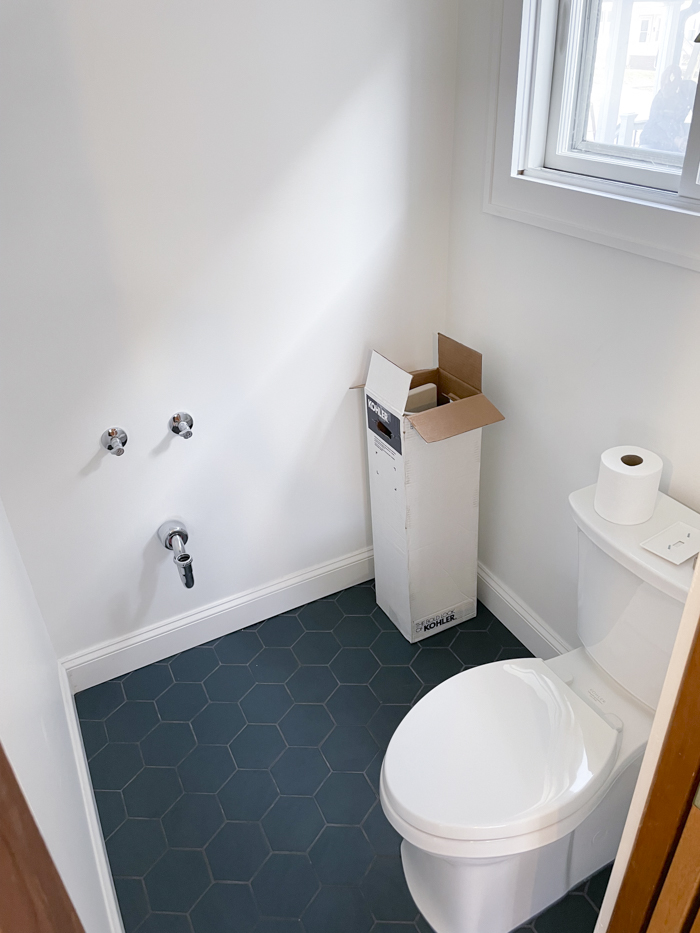
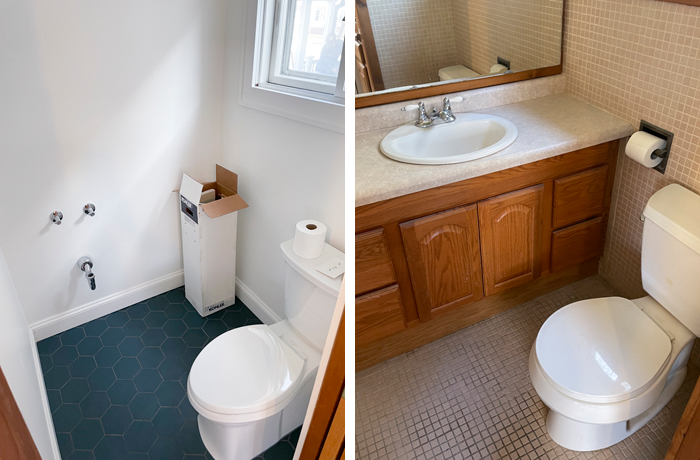
First things first, a peek of that easy-to-clean, flat-sided toilet was my most commented-on Instagram story ever. I love that we’re at the age where stuff like this excites us! If you’re the market for a toilet, you can find it here and here. I bought the recommended toilet seat for it.

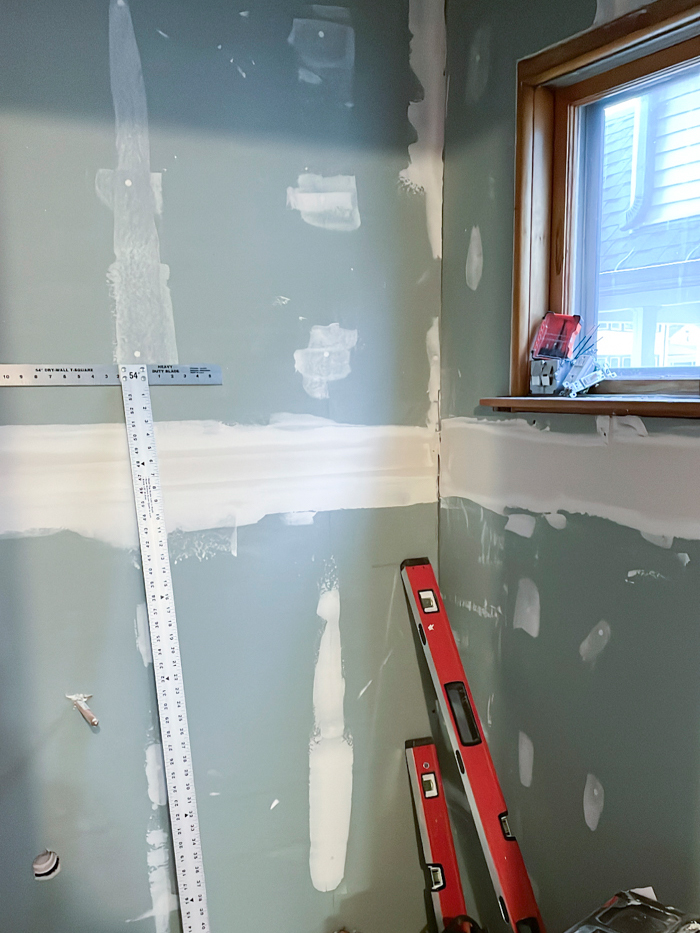
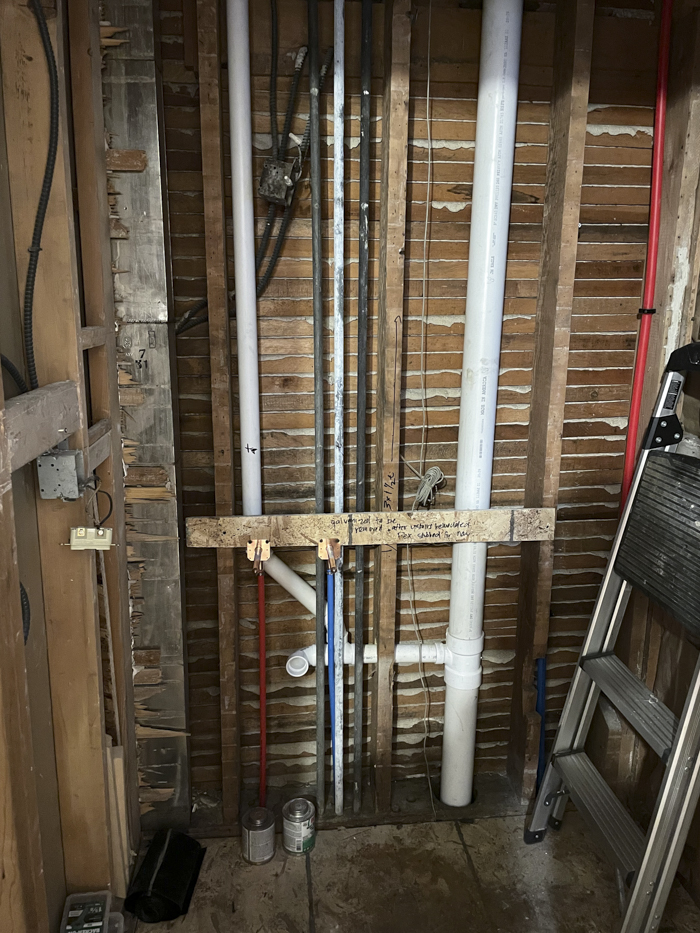
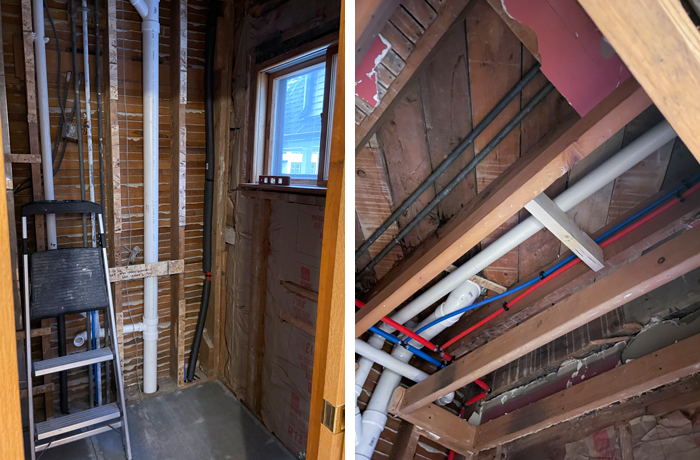
Shortly after we left off, the drywall went up and it finally felt like a room again! We had a few days of mudding and sanding. In a perfect world, we would have primed and painted before the tile went in, but we had some scheduling delays that moved the tile up on the priority list. And trust me, I was not mad at it. Seeing the tile installed made my heart soar and I could finally see my vision board come together. It’s one thing to make a collage in Photoshop, but it’s another to see your selections actually take shape and work together.

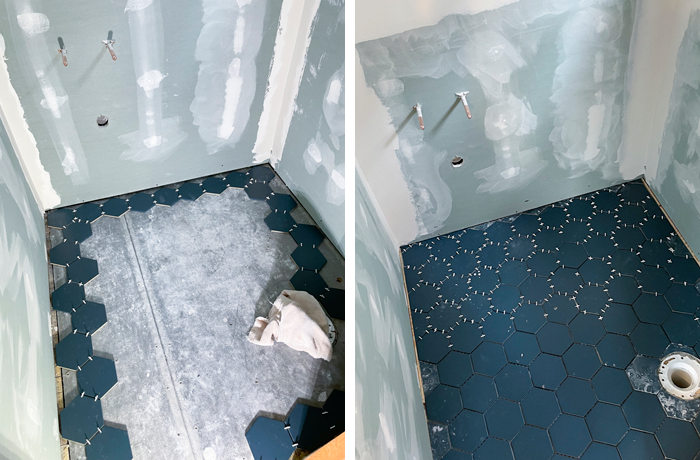
It was around this point where I snuck downstairs and smugly smiled to myself thinking “I have good taste.” Haha. But it felt so good to see the pieces fall into place so well — and quite literally at that. You’ll see that we lucked out and were able to place a full tile at each corner and along the sides of the room. We did have a delay with the grout, so after the tile set in mortar, the floor was covered and attention moved to the walls and woodwork.

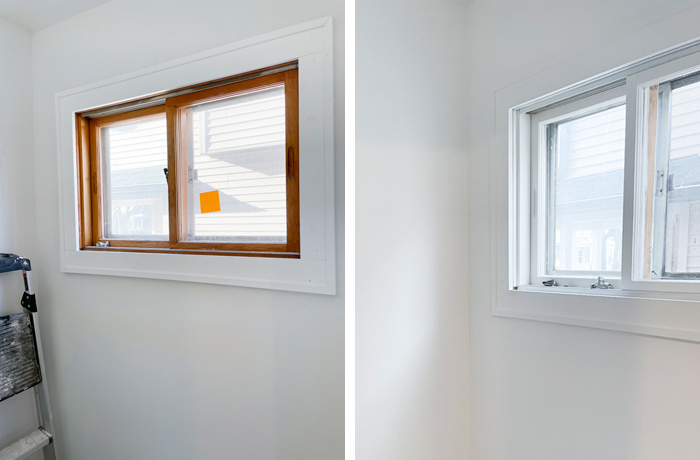
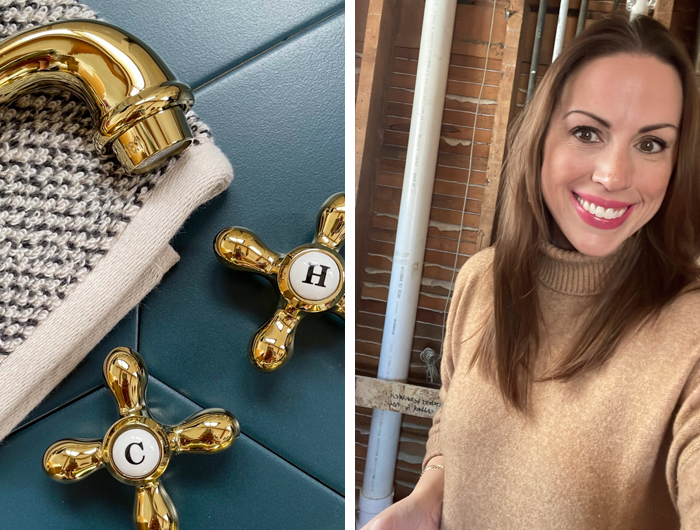
One of the things I really wanted to do in this space was make the millwork mimic that of the original trim in the house. They removed the frame and sill of the existing window in the half bath and rebuilt trim to match our window casings elsewhere. The window itself is pretty crappy and we’ll probably replace it down the road, but the new trim makes it seem so much larger and adds much-needed architectural detail in this space. The team still has some work to do with it to add a sill and a finishing piece over the seam, but I’m just so happy with it. They did a similar trim around the doorframe, and they put in baseboards that match the profile of our original trim on the first floor. (You can see these in the opening photo.) Our contractor’s team is so talented and they have such acute attention to detail that makes my perfectionist-heart sing!

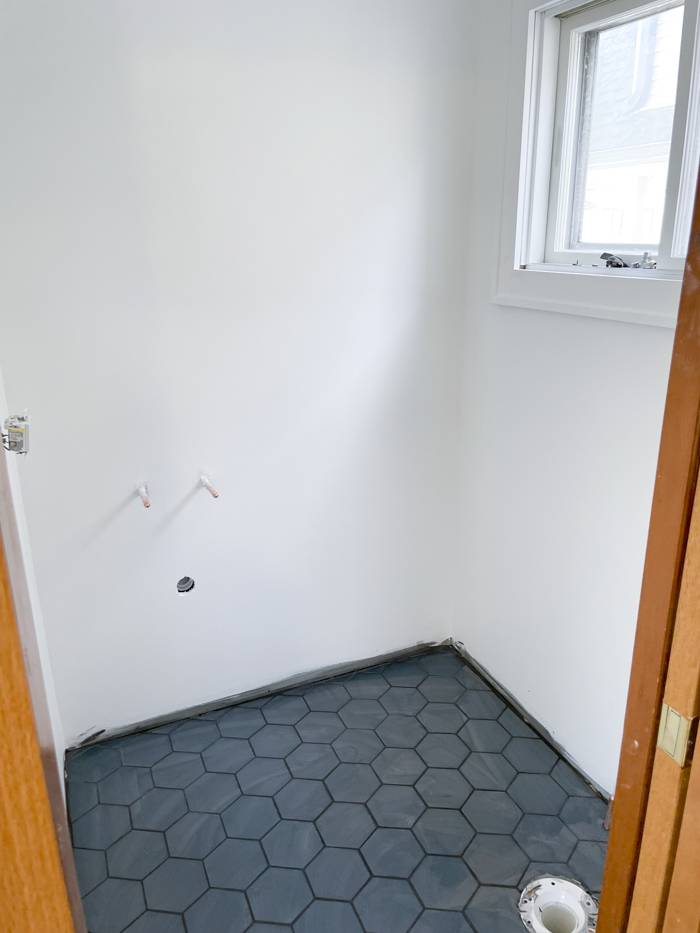
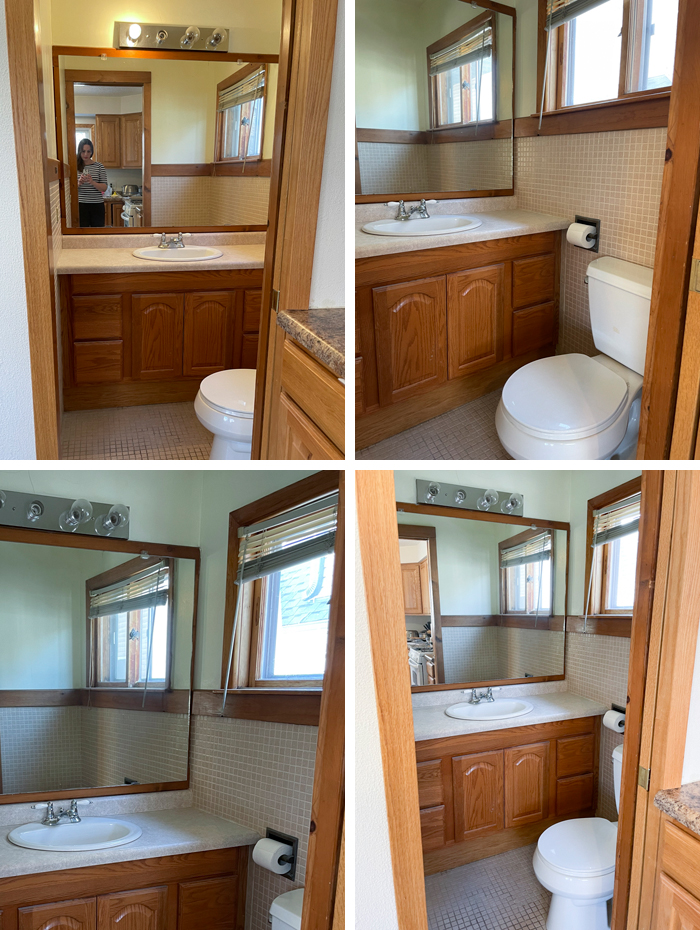
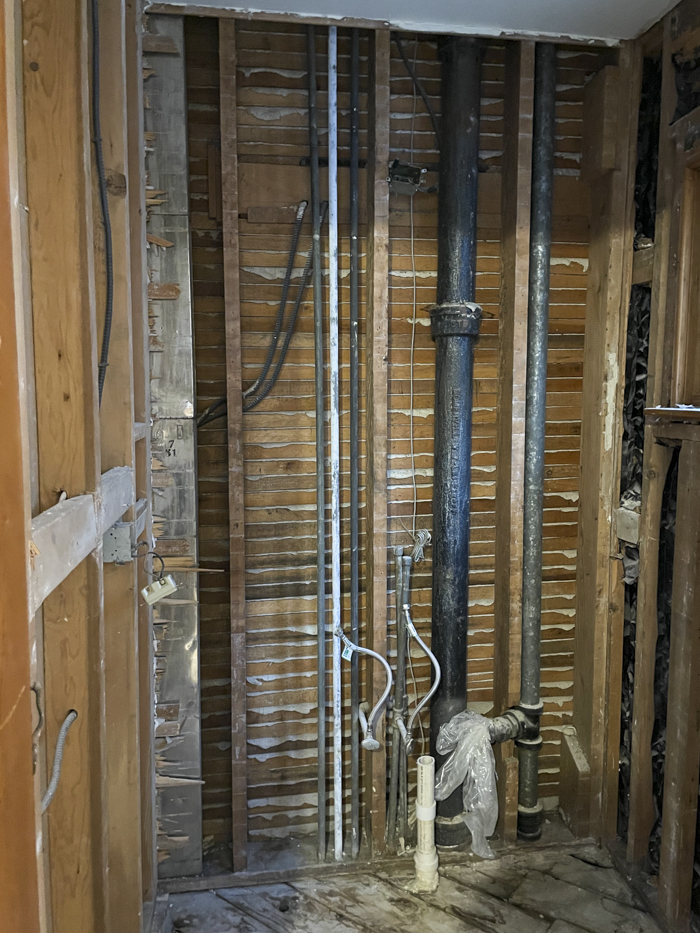
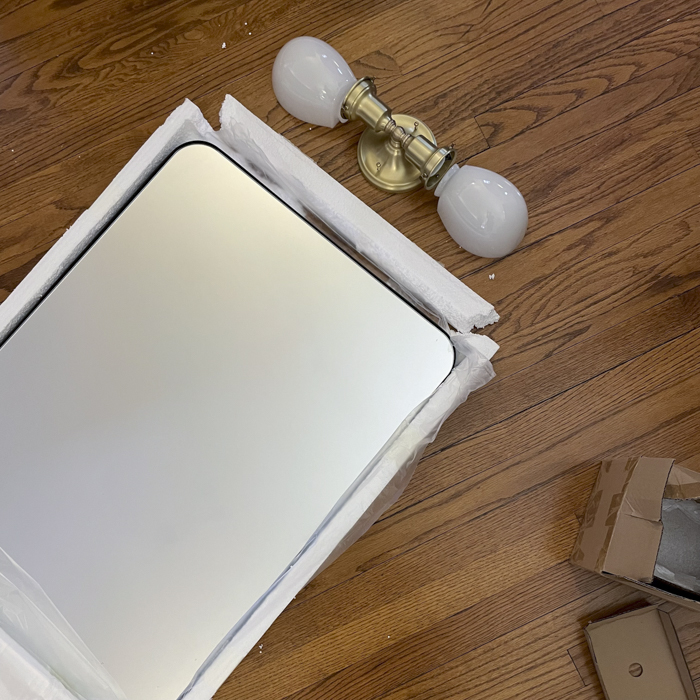
The grout arrived on Friday of last week, which allowed the team to get that taken care of fairly quickly. This week was all about dehazing the grout, placing the finishing pieces like the trim, and starting to install fixtures. We still have to seal the floor and finalize locations of things like the mirrors and towel bars, but we’re getting there! The team also moved to the main bathroom on Monday and have already completed demo and leveled the floor. I’ll share more about that space in the coming weeks!

Until then, here’s a tiny peek at how far along this room has come. I’ll do a reveal post once we’re complete with a full source list.

–
Let’s keep in touch!
Instagram / Facebook / Pinterest / Bloglovin’

This post contains affiliate links.

Filed Under: Bathroom, Home, Interiors, Powder Room Tagged With: Bathroom, half bath, home renovation, powder room, progress report, renovation diaries

Powder Room Progress: The “Good Stuff” Isn’t the Pretty Stuff

February 25, 2022 by jessica Leave a Comment

Interior blogs often focus on the pretty stuff — the “good stuff.” The stuff that comes after new drywall is placed and construction debris has long been cleared away. After beginning our own home renovations last week, I’ve come to realize that the pretty stuff isn’t the “good stuff.” The good stuff is the opportunity to improve your home’s mechanics, electrical, and plumbing to make a century home last another hundred years.

Before I tested positive for a COVID breakthrough infection and before our contractor’s crew began work, we estimated that our powder room would take two weeks from start to finish. That’s not quite how things actually went and I wanted to take a moment to document the progress we have made over the past couple of weeks. The crew did take a few days off from work over the past two weeks. There was an ice storm and a couple of the crew members that are on-deck weren’t comfortable with my COVID-positive status until I cleared the 10 days (can’t blame ’em). We’ll be at it full time starting Monday until both bathrooms are complete, barring any additional illnesses.

First up, here are some of the before images:

The powder room is off of the kitchen on the first floor. The kitchen and this powder room are both part of an addition to the house. Judging by the product selections, I’d guess this happened in the ’90s or early aughts. The room is approximately 25 square feet, which is a pretty decent size for a half bath, but the space wasn’t utilized effectively. When we started this project, we figured we’d keep the plumbing in the same locations — and for the most part that ended up being the case. It would be too pricey to move the toilet, even if it’s not in the ideal location for this space. That’s just a reality of renovations and budgets. The sink, as we came to learn was not correctly plumbed and would need to be moved. We’re going to center it with the door frame, so when you look into the room, you’ll see a pedestal sink, the mirror, and a sconce. You’ll still see that peek of the toilet seat, but eh, whatcha gonna do?

Here’s what we had when we opened up the walls. The pipe that ran to the sink was drilled through the floor, which apparently isn’t legal, and it wasn’t vented at all. The previous owner had also sealed an unused pipe with a wad of plastic. There was some minor water damage by the sink and toilet, which is to be expected. There was shockingly insufficient insulation on the exterior wall. And, of course, we had galvanized pipes. Replacing the pipes wasn’t part of the original scope of the project, but galvanized pipes can rust and crack over time. Having the walls already open is by far the best opportunity we’d have to proactively take care of a future problem. Our contractor said that it would cost another $500 to replace it all with modern PVC plumbing. The plumber was here longer than the half day that they anticipated, so I expect the final dollar amount to be higher. Still worth it because look at the grossness that’s inside of those pipes:

Ew. Haha. So, the thing with galvanized pipes is that they’ll rust on the inside of the pipe, too. The inside then becomes rough, making it more likely that hair and other gunk will get stuck leading to frequent clogs. And let me tell you, we are very familiar with this issue. Our upstairs shower connects to this plumbing and for the past four years we’ve lived here, we’ve been standing in ankle-deep water after a shower every single time. Snaking the pipes and Draino didn’t do much — it was a bigger problem that we are so grateful to have taken care of. You wouldn’t believe my excitement the first time I showered upstairs after the new pipes were in and the water drained like it should! I told our contractor later that it I didn’t know what kind of witchcraft the plumber did, but I’m a fan — to which he said “it’s the magic of PVC pipes.” Money well spent.

Here’s where we decided to move the sink. It’s a pedestal sink that will now be centered across from the doorway rather than being centered on the wall. This opens up space to the right where we can put a basket of towels or toilet paper. We’re also considering installing some floating corner shelves for plants.

You can see all of our beautiful new pipes and supply lines here — the real “good stuff.” Those remaining galvanized supply lines will be pulled when we’re working on the upstairs main bathroom. They’ve since insulated all of the hot water lines. (You can learn about the benefits of pipe insulation here.) There’s also new insulation in the exterior wall and the tile-ready subfloor has been laid. (And look at that bold red ceiling that used to be in the original galley kitchen! I had no idea!)

As you may recall from my product overview for the space, I had hoped we’d be able to add an inset medicine cabinet. Sadly, my dreams of having guests low-key snoop through my meds has been dashed. There isn’t any room in the walls to make an inset cabinet work and I’m not keen on the wall-mounted versions. I found this mirror on Overstock while I grumpily looked for an alternative. I had low expectations for it, despite the glowing reviews, but I forgot all about the medicine cabinet once the new mirror arrived. It’s hefty and well made and I just love it so much — plus it’s cheaper than the original one I wanted at just $130. It has the vintage-inspired look I was going for when paired with the sconce.

Even if the “good stuff” is the practical improvements, I’m still excited about the pretty stuff.

–
Let’s keep in touch!
Instagram / Facebook / Pinterest / Bloglovin’

This post contains affiliate links.

Filed Under: Bathroom, Home, Interiors, Powder Room Tagged With: Bathroom, home renovation, powder room, progress report, renovation diaries

Living Room Progress: Inspection vs. Today

March 7, 2018 by jessica 2 Comments

Living Room Before and After

We still have work to do in our living room in terms of accessorizing and styling, but I thought I’d give you a peek into where things are at right now compared to when we did our inspection in May. Obviously the before photos are on the dim side and that’s not an intentional editing choice to make you think it’s worse than it was. It was really that bad. Most of the light bulbs were partially unscrewed so they wouldn’t turn on and just about every window in the house was covered by fabric (men’s shirts and old sheets rather than window treatments). The paint was this awful creamy color that wasn’t quite as yellow in the images below, but it was as dingy and soul sucking as it appears here.

Living Room Before and After

The first thing we tackled (after removing kitchen cabinetry from the guest room and a random square of teal carpet in the coat closet) was repairing cracks in the plaster walls and painting as much as we possibly could before we had our floors refinished. We got through the living room, dining room, the wood-paneled master bedroom and office, the guest bedroom, and the tiny room that eventually became my closet. The far wall in the staircase was left unpainted at the time because I’d like to wallpaper it. I didn’t want to spend the time painting something I was just going to cover up eventually. At this point, though, we’re leaning toward painting it white and doing wallpaper next year for my living room. It’s such an expensive project and we have other priorities to take care of. However, painting everything else white and removing the window coverings opened up the space and made it feel brighter and more welcoming, so the cream wall doesn’t bother me too much at the moment. My plan is to paint the upstairs hallway, ceiling, and trim this month and get to the top of the stairs. We’ll hire someone to finish up the stairwell since I’m not graceful enough to stand on a ladder while I paint. We have pretty high ceilings there and I have no doubt that I’d fall or get paint all over the stairs.

Living Room Before and After

After about a month of painting every night after work and on weekends, we finally got a week-long break when our floors were refinished. The red oak floors were in awful shape (check out this pic of the floor in my closet) with patches in the floor that were different colors, and scuffs and scratches throughout. Upstairs, the stain was on the yellow side. I’m not sure if it was the polyurethane was showing age or if it was just a bad stain choice to begin with. Our floor refinisher said that the downstairs floors had likely never been refinished, which is great for future owners because you can only refinish floors approximately 10 times since you’re sanding off approximately .75 to 1mm with each round. We went with Minwax’s “Early American” stain. It’s lighter than the original color, but still felt traditional in the 1920s home. The biggest selling point was that it didn’t have red or yellow undertones. We paid $2.75 per square foot and ultimately came in just shy of $2,600. Worth every penny. (Pro tip: hardwood floors will eventually get scratched no matter what you do. Use a stain pen to camouflage the imperfections.)

Living Room Before and After

Replacing the sconces is next on the to-do list for the living room. We’d also like to find a better throw pillow, a larger rug, and redesigning the corner that we have that wood chair in the photo above. The side chair is great for putting on shoes and using for additional seating. However, a mid-century modern bench might fill the space better. I’d also like to find artwork to hang in that area. All that stuff is easy, though, and will fall into place as we find the right pieces. I don’t want to push anything and accidentally have our house look like the 2017/2018 West Elm catalog because I was too impatient to wait for the right item. Now that the living room is in a good spot, we’re talking about what room to embark on next. It’s a toss up between the dining room or kitchen. The dining room is definitely easier and really just requires furniture, a woodworker to fill in spots were the trim and crown molding is missing, and window treatments. The kitchen is a more adventurous project. It’ll all be cosmetic updates and not a true renovation, but there’s a lot to do in that room from skim coating the textured walls to replacing the linoleum flooring that has a gross river rock design.

Sources: Target mirror | West Elm lamp | West Elm bar cabinet | Minted art (c/o) | Braxton Studio chair | EQ3 leather chair | Younger Furniture sofa | Faribault Mills blanket | West Elm coffee table | Target vase | CB2 candle holders | Ekais credenza | CB2 decanters | vintage duck bottle opener | West Elm planters | West Elm rug

–
Let’s keep in touch!  Instagram / Facebook / Pinterest / Bloglovin’

Filed Under: Home, Lifestyle, Living Room Tagged With: house updates, living room, progress report

Hello!


Jessica Hamm
Hello there! I'm a first-time homeowner updating a 1920s house in Madison, Wisconsin. I have a penchant for travel and a love of costume jewelry.

Keep In Touch

  • Bloglovin
  • Email
  • Facebook
  • Instagram
  • Pinterest
  • Twitter

Search

Latest Home Finds

Visit Me on Instagram!

I’m challenging myself to get through a backlog I’m challenging myself to get through a backlog of travel photos before we book our next trip. First up, photos of the gothic York Minster. I’m not religious in the slightest but I can’t resist stunning architecture and the opportunity to climb hundreds of cathedral stairs for a city view. This one only had a single rest stop about halfway up the flight of 275 steps for a closeup view of the flying buttresses — and a waiver you had to sign before your ascent to promise you’re healthy enough to make it.
Can you hear meow? 😸 Lily is putting the phone Can you hear meow? 😸 Lily is putting the phone nook to good use.
Christmassy mornings. Christmassy mornings.
Thanksgiving Bake: Flourless Chocolate Wave Cake f Thanksgiving Bake: Flourless Chocolate Wave Cake from Dessert Person by @csaffitz

#dessertperson #thanksgiving #eastfork #eastforkdoesmydishes #eastforkpottery #dansk #food52 #dessert
Visiting York earlier this month put us in the Hal Visiting York earlier this month put us in the Halloween spirit. While it claims to be the most haunted place in Europe and is dubbed the city of a thousand ghosts, we only encountered the wire-mesh sculptures of Ghosts in the Gardens (@the_york_bid) and the family of souvenir ghosts I brought home from @yorkghostmerchants. 

#ghostsinthegardens #york #hauntedyork #yorkmuseumgardens #yorkghostmerchants
Instagram post 18062569012742534 Instagram post 18062569012742534
Load More... Follow on Instagram

Copyright © 2025 · Jennifer on Genesis Framework · WordPress · Log in