BEDKNOBS & BAUBLES

  • Interiors
    • My Home: Main Bathroom
    • My Home: Powder Room
    • My Home: Living Room
    • My Home: Dining Room
    • My Home: Main Bedroom
    • My Home: Front Porch
  • Lifestyle
  • Travel
    • Travel Posts
    • Travel Guides
  • Style
    • Style Posts
    • Outfits
    • The Coveted
  • Collaborate
  • About

How to Remove Paint from Original Antique Hardware

October 20, 2020 by jessica Leave a Comment

How to Remove Paint from Brass Hardware

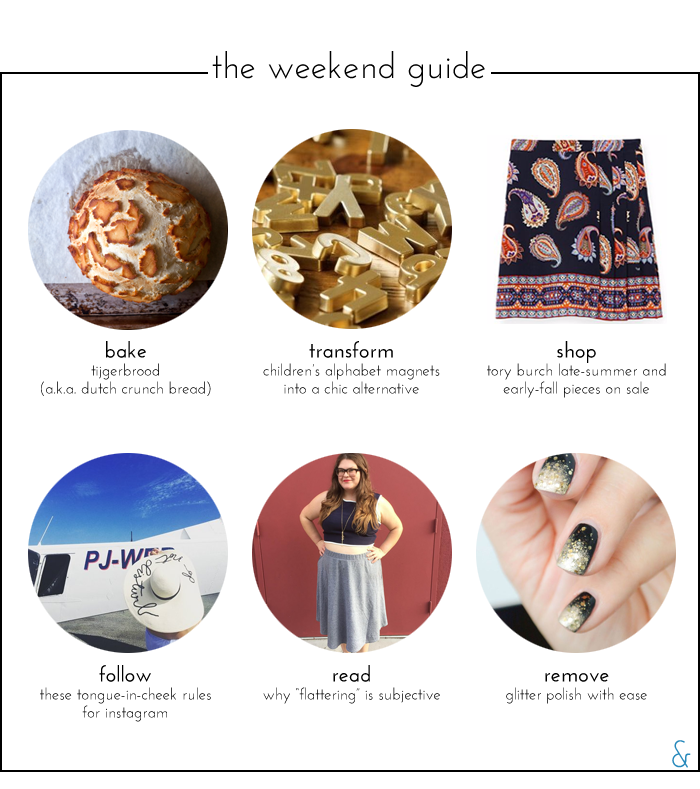
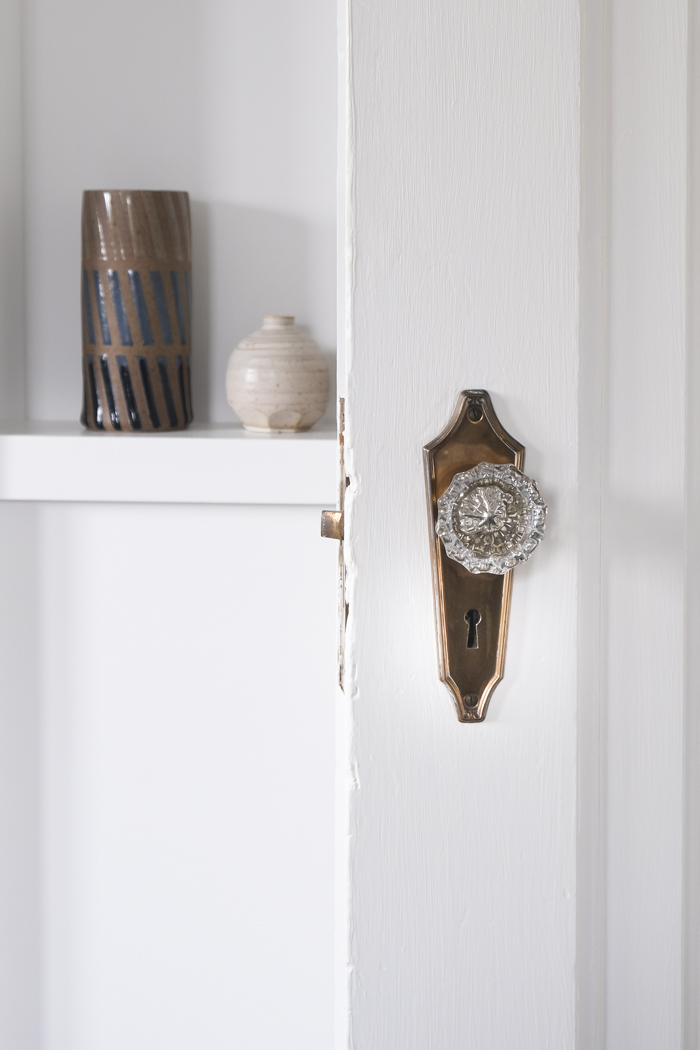
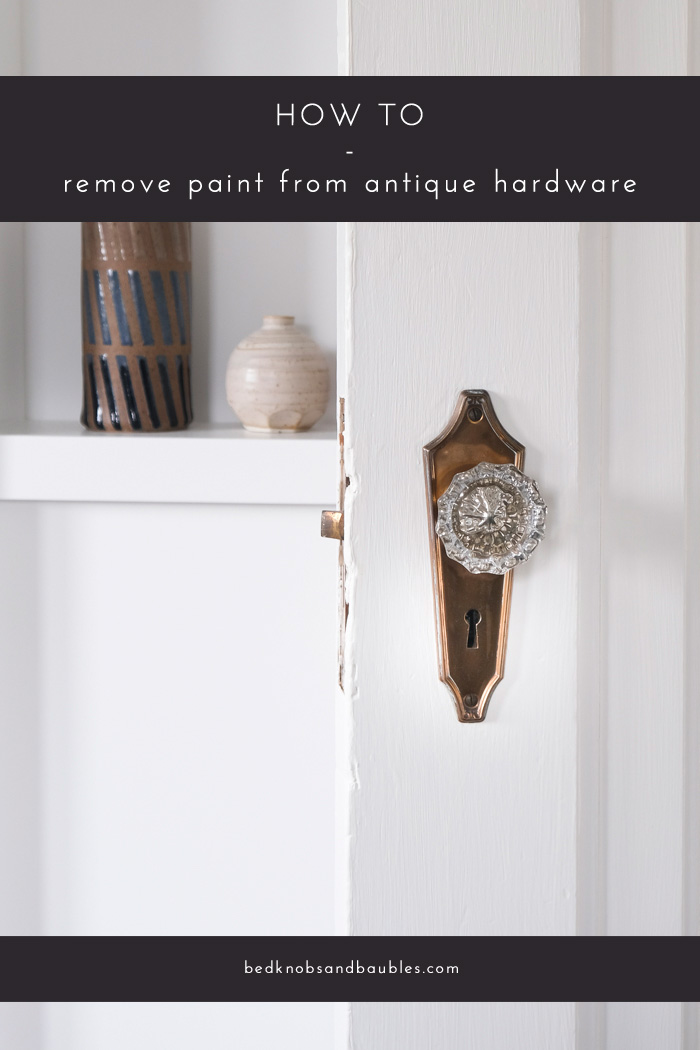
As far as I’m concerned, people who paint over hardware are the worst kind of people. (Well, no, but they’re up there.) I know that taking hardware off of the door and frame is a pain. It’s difficult to rehang a door. It’s annoying to take precious time away from painting in order to do the prep work. However, please, please, please just do it for people like me who have spent literal hours removing paint and polishing the original brass hardware in her 1920s home. That said, removing old paint (be it latex or lead-based) is an easy one, even if it can be time consuming.

How to Remove Paint from Brass Hardware

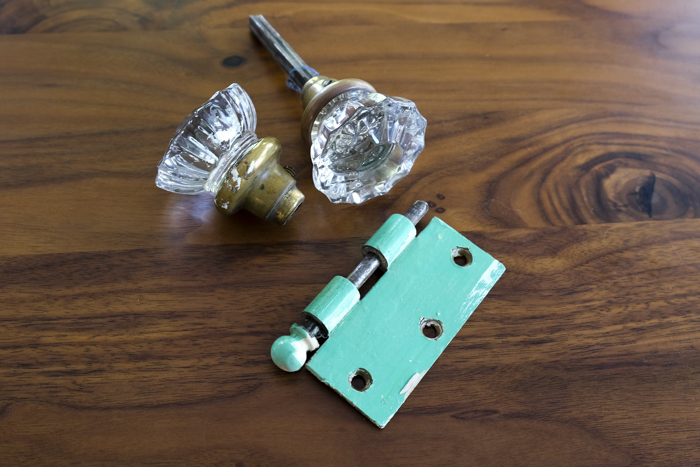
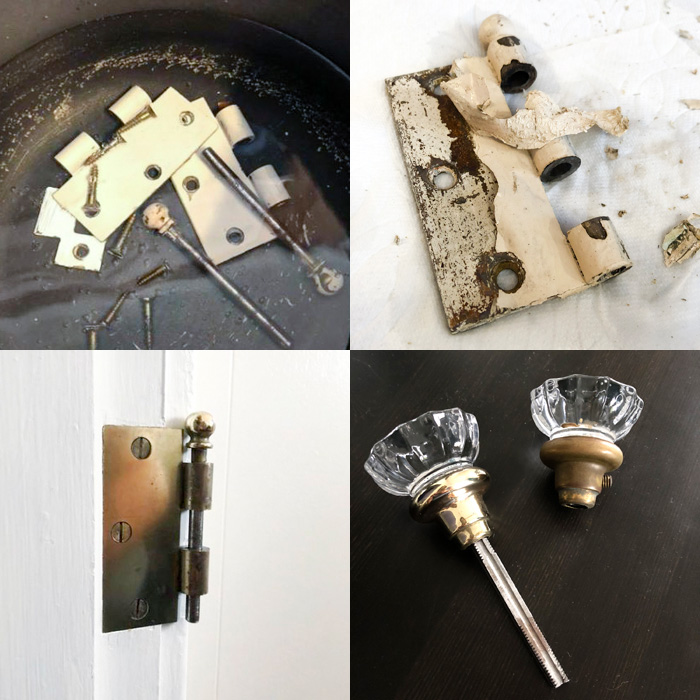
All of the hardware in our home was painted over to various degrees. (I mean, look at that green hinge from our guest room.) For the most part, the door hinges and mortise locksets were in the worst shape and only a few splatters were on the door knobs and rosettes. After doing some research, I found the following to being the most efficient process to removing the paint and bringing back luster to the brass.

Materials:

  • Old stock pot – You’re going to be boiling water and your hardware in this, so use an old one that you never plan to use for food again. If you don’t have one that you can dedicate to house projects, check Goodwill. Alternatively, here’s the cheapest one I found on Amazon with Prime shipping. You can also use an old Crock-Pot. This can be on the smaller side, but a lot of water will evaporate depending on how much hardware you’re cleaning at once.
  • Tongs – The cheaper the better for the same reasons as above.
  • Heat-resistant rubber gloves – For handling hot hardware when it’s done boiling.
  • Nylon bristle brush – You’ll need it to loosen some of the paint. If your hardware is already scratched and you don’t mind a few more scuffs, you can use a brass bristle brush. Keep in mind, though, it’s much more abrasive and you’ll be leaving scratches in its wake.
  • Utility knife – Useful for getting bits of paint out of small crevices.
  • Flitz polish – This metal polish has rave reviews on This Old House and it works really well. I used it for this project, but also on other vintage brass pieces.
  • Citristrip paint remover – You’re using boiling water for the majority of your paint removal, but as you’ll see below, there are a few times you’ll want to avoid dunking your piece in water: namely glass door knobs and mortise locksets. More info is in the “tips” section below.
  • Latex gloves – Between the metal polish, paint remover, and old flecks of paint, I promise you’ll want to keep your skin protected.
  • Old rags or paper towels – You’ll use these for polishing the hardware. I opted for paper towels to make cleanup easier, even if it’s not the most eco-friendly of choices.
How to Remove Paint from Antique Hardware

Steps:

  1. This step is crucial to making your life easier: Take each hinge off and slip them into plastic baggies labeled with the location of each component. I had labels such as “main bedroom door frame top” and “main bedroom door frame bottom” to keep everything as organized as possible. While the hinges all look the same, I didn’t want to risk swapping anything around if there had been imperceptible warping over the past 90 years. To that end, if there are shims behind your hinges, keep and label those, too. They’re there for a reason.
  2. Bring water to a boil in an old pot. You can also use an old Crock-Pot and let it simmer overnight. I prefer using a pot on the stovetop so I could move through the process in an afternoon for each set of hardware rather than waiting until the next day.
  3. Drop your hardware in and bring it to a boil. (Again, I did this section by section to avoid mixing up any hinges.) It takes about 20 to 30 minutes at a boil for the paint to loosen from the hardware, so be patient. And, please do this in a well-ventilated area. Theoretically, the latex paint will peel off in sheets and lead-based paint flakes off. Apparently in this situation, the lead isn’t as much of a concern compared to sanding it because the wetness is keeping it from being airborne. (Don’t hold me to this, though, it’s what I read on This Old House and I trust those folks. We’ll see how my lungs fare in a few decades.)
  4. Once the paint is starting to come off the hardware, remove it from the boiling water with a pair of tongs. This is where your heat-resistant rubber gloves come into play, too. You’ll need to hold the hardware and use your brush to scrub the remaining bits of paint off — and the hardware is extremely hot. Some of the paint might be stubborn. In those instances, I used a utility knife to gently scrape away the paint. This was also useful for getting into the crevice of screwheads. If that doesn’t work, put it back in the boiling water for a bit longer.
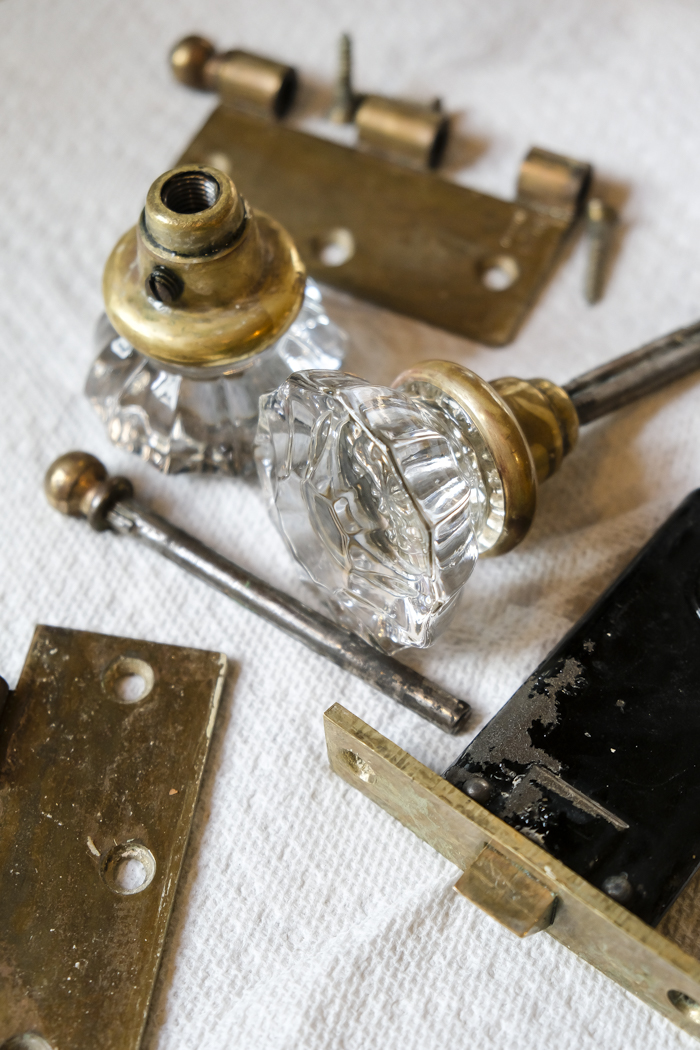
  5. At this point, you’ll need to let your hardware cool. It’ll look similar to the photo below. If you have bits of paint leftover after cleaning it, you can use the utility knife to get at the little bits before going to the next step: polishing.
  6. Polishing your hardware is incredibly satisfying. I prefer using Flitz polish. It’s non-toxic, but you might want to crack a window as it doesn’t smell the best. Donning a pair of latex gloves, smear polish on your hardware and give it a minute to start reacting. Then, using either a clean rag or paper towels, rub the polish over the hardware. You’ll need to keep finding a new area of your rag or paper towel as you remove more and more of the black tarnish from your hardware. A rag will be less abrasive, but I found that I preferred using paper towels as I went through quite a few of them.
  7. Rinse your hardware under running water, dry it, mount it!
How to Remove Paint from Brass Hardware

Tips:

  • Do not boil glass doorknobs. Water can get stuck in the knob itself and take awhile to evaporate. In this instance, use Citristrip, a chemical-based paint remover that’s safe for indoor use, to remove the paint. You’ll need to protect your hands with a pair of gloves and smear on the chemical remover and wait a half hour or so. The paint will start to pull away from the hardware and you can wipe it off. I then rinsed it well under running water to remove the chemical and stop the reaction.
  • Paint on the glass portion of the doorknob can often be scraped off with a utility knife without scratching the glass.
  • I also did not boil the mortise lockset to avoid any accidental rust of the interior components.
  • When remounting the hardware, I put a fresh pair of latex gloves on. If you weren’t careful about removing every last bit of patina when polishing your hardware, it’s easy to transfer some of that black grime to your fingers and inadvertently get it on your door and frame. It didn’t clean off particularly well when the smudges happened to me, but a bit of touch-up paint did the trick.

Pin It for Later:

How to Remove Paint from Antique Hardware

–
Let’s keep in touch!
Instagram / Facebook / Pinterest / Bloglovin’

This post contains affiliate links.

Filed Under: DIY, Home, Interiors Tagged With: diy, Doors, Hardware, House Projects

Weekend Reading

March 24, 2017 by jessica 1 Comment

Weekend Reading 03.24.2017

I can’t believe April is right around the corner! Where has the year gone already?! Next month should bring with it a spike in available homes for sale, so we’re hopeful we’ll find “the one” this time around. With that major purchase on the horizon, we’re pinching our pennies and planning to spend the weekend at home with new recipes to try and cocktails to mix up. I’m actually looking forward to a few days at home after traveling the past two weekends. I need a chance to finally unpack, run errands, and spring clean our apartment. What’s on your agenda?

SIP: It’s going to be 70 degrees today! It’s back to being seasonably chilly tomorrow, but I’m embracing the warm weather with a refreshing citrus cocktail and open windows!

DIY: Straw bags embellished with pom poms are everywhere this spring and they usually come with a high price tag. Follow in Grace’s footsteps and make your own instead! (She also linked to an Etsy shop for inexpensive straw bags. I want this one for the farmers’ market. It’s a steal at $28!) Use this bag and this one for inspiration!

SNAP: Are your blog photos feeling a little lackluster? Jess shares her tips to up your photography game.

AWW: Right?!

MISSING THE MARK: A couple of years ago, Anthropologie blamed its slipping sales on poor dress choices. However, the retailer still hasn’t got it right.

SNAG: These sandals are like the more refined version of the bauble-embellished pair I snagged at Zara. They’re a great deal at $70!

TAKE: Stop mindlessly scribbling notes during your work meetings and actually record the information effectively.

IN CASE YOU MISSED IT:

  • A few snapshots from our trip to New Orleans. I’ll post a full recap of what we did in a couple of weeks!
  • This month’s “budget” update. Oops!
  • Many of the pieces I purchased this month went in my suitcase for New Orleans.
  • The latest “Behind the Baubles” Q&A with the founder of Sweet & Spark. An interview with Jenny Bird is coming up next week!

ON MY WISH LIST:

  • The bow detailing on this blouse.
  • This dress for summer vacations.
  • Bow-topped slides. (I prefer the gingham pair.)
  • A pair of wear-with-everything sandals.
  • A poplin wrap dress with ruffles.
  • A feminine dress to wear with sneakers this spring.

Filed Under: Weekend Guide Tagged With: cocktails, diy, the weekend guide, weekend reading

The Weekend Guide

August 29, 2015 by jessica 3 Comments

WeekendGuide082915

BAKE
The best thing about autumn weekends it that it gives you the excuse to cozy up inside with a hearty meal in the Crock-Pot and fresh bread in the oven. I’m pinning this Dutch tijgerbrood (tiger bread) recipe for later.

TRANSFORM
A coat of gold spray paint instantly transforms children’s alphabet magnets into something adults wouldn’t mind having on the fridge. A matte black or lacquered white would look fab too.

SHOP
Tory Burch’s late-summer and pre-fall pieces are finally on sale. Pool days are wrapping up, but this pretty bathing suit is worth purchasing for next year. I’m also in love with this paisley skirt. There are so many colors in the fabric that you could wear just about any hue on top. Throw on a turtleneck or a Tippi sweater and a pair of boots, and you’re all set for fall.

FOLLOW
Here’s a hilarious guide for making the most out of Instagram.

READ
There’s no shortage of guides available on identifying the most flattering silhouette for your shape, but does everyone actually agree on the rules. A member of the BuzzFeed staff visited five different retailers to find out. 

REMOVE
I’ve pretty much stopped wearing glitter nail polish because it’s nearly impossible to get off. Elle tried five different methods to find the easiest way to remove that sparkle. (Here’s the link for the ombre manicure.)

EARLIER THIS WEEK
I found a colorful wall for my not-so-colorful outfit.
Five ways to wear a fall cape.
The two items I purchased in August (and thoughts on the things that didn’t work).
Five fall finds under $55.
My most cliche Instagram yet. (I’m loving your suggestions on what to add!)

Filed Under: Weekend Guide Tagged With: diy, dutch tijgerbrood, tory burch sale

The Weekend Guide

July 19, 2015 by jessica 1 Comment

WeekendGuide071815

LOSE
If you need another reason to add Italy to your must-visit list, you can now wander around the world’s largest maze.

EMBROIDER
Add a tiny embroidered design to your Instagrams to make them even more special.

READ
Europe has been in the news quite a bit this summer. Read these tips before boarding your transatlantic flight.

ACCEPT
Ten truths about money. (Thanks to Rachelle for linking to it last week!)

DISCOVER
This article ponders the reasons we still love Gilmore Girls, even though it has been off the air for eight years. I’m thinking of starting the series from the beginning just so I can listen to the Gilmore Guys podcast with the episodes still fresh in my mind.

BAKE
Put that summer produce to good use with this raspberry rhubarb tart. Although, if you’re afraid of bears, you might be better off with a classic strawberry rhubarb pie.


additional images via 1, 2

Filed Under: Weekend Guide Tagged With: diy, european travel tips, money management, raspberry rhubarb tart, world's largest maze

March 5, 2012 by jessica Leave a Comment

DIY Necklace

With its lightweight wood beads and color-blocked accents, Kate Spade’s Rosewood Dot Necklace is a fun piece for spring – and an even better DIY project.

You will need:

  • 13 wood beads (I opted for smaller beads than the original version.)
  • 14 gold beads
  • flexible beading wire
  • length of chain
  • clasp
  • nail polish to lacquer half of 6 beads
  • 2 crimping beads
  • crimp tool
  • pliers

DIY Necklace

Choose your lacquer color to paint the beads. I used Revlon’s “Minted” polish.

DIY Necklace

Wrap tape around the beads so you get a clean line. I taped each one to a toothpick, then poked the painted beads into a cardboard box to let them dry undisturbed.

DIY Necklace

If all went well, you should be able to peel off the tape gently to reveal a straight line. Use a little bit of nail polish remover to get rid of any smudges.

DIY Necklace

String the beads in the following order: unpainted, gold, painted, gold, and so on.

DIY Necklace

Attach the beaded strand to the chain, add a clasp, and you’re done!

DIY Necklace

https://bedknobsandbaubles.com/with-its-lightweight-wood-beads-and-color-blocked/

Filed Under: Uncategorized Tagged With: baubles, diy, do it yourself, jewelry, mint, necklace

  • 1
  • 2
  • Next Page »

Hello!


Jessica Hamm
Hello there! I'm a first-time homeowner updating a 1920s house in Madison, Wisconsin. I have a penchant for travel and a love of costume jewelry.

Keep In Touch

  • Bloglovin
  • Email
  • Facebook
  • Instagram
  • Pinterest
  • Twitter

Search

Latest Home Finds

Visit Me on Instagram!

I’m challenging myself to get through a backlog I’m challenging myself to get through a backlog of travel photos before we book our next trip. First up, photos of the gothic York Minster. I’m not religious in the slightest but I can’t resist stunning architecture and the opportunity to climb hundreds of cathedral stairs for a city view. This one only had a single rest stop about halfway up the flight of 275 steps for a closeup view of the flying buttresses — and a waiver you had to sign before your ascent to promise you’re healthy enough to make it.
Can you hear meow? 😸 Lily is putting the phone Can you hear meow? 😸 Lily is putting the phone nook to good use.
Christmassy mornings. Christmassy mornings.
Thanksgiving Bake: Flourless Chocolate Wave Cake f Thanksgiving Bake: Flourless Chocolate Wave Cake from Dessert Person by @csaffitz

#dessertperson #thanksgiving #eastfork #eastforkdoesmydishes #eastforkpottery #dansk #food52 #dessert
Visiting York earlier this month put us in the Hal Visiting York earlier this month put us in the Halloween spirit. While it claims to be the most haunted place in Europe and is dubbed the city of a thousand ghosts, we only encountered the wire-mesh sculptures of Ghosts in the Gardens (@the_york_bid) and the family of souvenir ghosts I brought home from @yorkghostmerchants. 

#ghostsinthegardens #york #hauntedyork #yorkmuseumgardens #yorkghostmerchants
Instagram post 18062569012742534 Instagram post 18062569012742534
Load More... Follow on Instagram

Copyright © 2025 · Jennifer on Genesis Framework · WordPress · Log in