BEDKNOBS & BAUBLES

  • Interiors
    • My Home: Main Bathroom
    • My Home: Powder Room
    • My Home: Living Room
    • My Home: Dining Room
    • My Home: Main Bedroom
    • My Home: Front Porch
  • Lifestyle
  • Travel
    • Travel Posts
    • Travel Guides
  • Style
    • Style Posts
    • Outfits
    • The Coveted
  • Collaborate
  • About

Home Projects for the Next 6 Months

January 8, 2020 by jessica Leave a Comment

Mid-century Modern Living Room and Entry
This was taken in January 2019. I love looking back at how things have evolved. You can see a more recent image here with the artwork we added above the entry table.

Sometimes I get pangs of jealousy when I look at home bloggers like Chris Loves Julia who dive into their house projects and seem to make major transformations in such a small amount of time. And then I remind myself that it’s their job. For most of us, house projects have to be balanced with occupations, vacations, social schedules, and monetary commitments — all of which hinder the grandiose plans of a remodel or a fully decorated place on a short timeline.

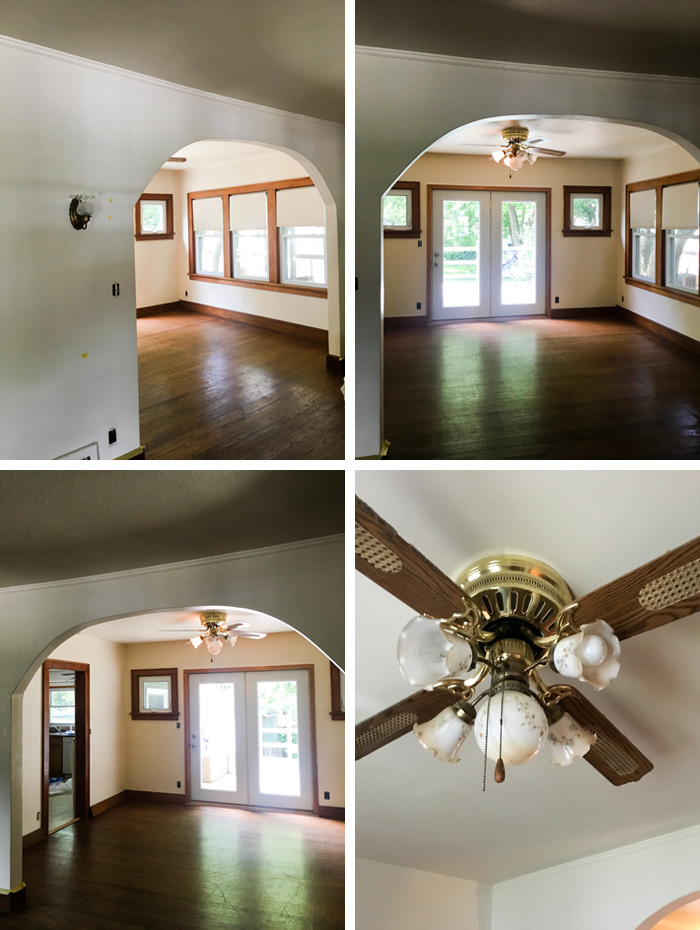
I was completely naive to this when we closed on our house summer of 2017 and thought we’d be living in a near-complete home by now. That’s not even close to reality! It is fun to look back, however, at the progress we have made like painting the wood paneling, having this built-in installed in to divide the “open-concept” bedrooms, and finally replacing the old storm door. So, in an effort to keep things moving along, I put together a list of things I’d like to complete in the next 180 days, listed out by month. Some are easy and won’t take more than a weekend or two. Others are a bit more ambitious or pricey, but I tend to have more success when I hold myself accountable to a timeline. Here’s what’s on deck:

January

  • Finish removing paint from old door hardware.
  • Paint the door frames in the guest room.
  • Mount doors in the guest room.
  • Hire electrician for a couple of projects.
  • Choose stairwell paint color.
  • Hire painter to paint the stairwell in February/March.
  • Organize our beer collection in the basement and purchase wine racks for the corked bottles that need to stored on their sides.
  • Order materials samples for roller shades to install in the bedrooms.

February

  • Have our stairwell professionally painted. (We already got a quote for painting and plaster repair of some cracks in the space. It’s $840, which is why we’ve put it off a bit. I wanted to do wallpaper, but that’s going to be at least $1,000 in wallpaper alone and we’re not planning to live here forever. It seems like a smarter decision to paint now and allocate money to other projects before something as indulgent as wallpaper.)
  • Install door for my closet. (Our carpenter has the door now to do restoration work on it, so it’ll need to be painted before putting it up. This might be pushed back to March, depending on when he’s done with it. I told him it wasn’t a priority and can take a backseat to other projects he has.)
  • Replace the light fixture in our office.
  • Replace the light fixture in Dave’s closet.
  • Purchase and install roller shades or drapes for the bedrooms and office.
  • Address our closet organization needs. Purchase systems that will optimize the spaces, and install by the end of March.

March

  • Install closet organization systems.
  • Fill in the guest room trim with vinyl spackling to hide the nail holes and joints.
  • Paint the guest room walls and trim.
  • Replace the door handle leading to our sun room with a vintage one (or replica) that coordinates with the rest of the house’s hardware.
  • Mount exterior garage light. (We’ve had a solar-powered light to install since last year and haven’t gotten around to it yet. Oops!)

April

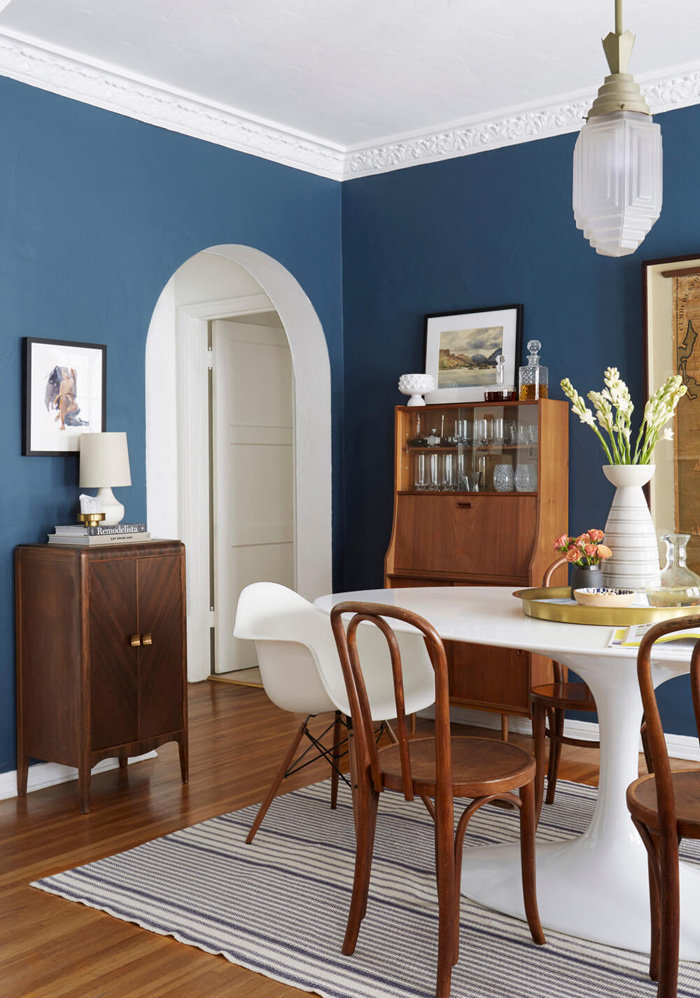
  • Purchase and install new light fixture in the guest room.
  • Start seriously looking for dining room storage, whether it’s a vintage sideboard, new credenza, or a even a modern ladder bookshelf.
  • Organize the basement.
  • Catch up on any projects that didn’t get done in the first three months!

May

  • Stain front porch and deck — assuming we have enough days in a row that are warm and dry enough for it. (Considering this project also includes power washing and sanding, I think it’s plenty for the month!)
  • Purchase planters and shade-tolerant plants to spruce up the front porch.

June

  • Budget bathroom refresh. (We were discussing our priorities for house renovations that we’ll need to hire someone for and I think the front of the house and sun room will win out. So, in an effort to make the bathroom cuter than it is, I’m going to make cosmetic upgrades and swap out light fixtures, paint the cabinets and walls, install new hardware, and we might try replacing the linoleum flooring with a different design/color. I’m also toying with the idea of painting the tiles or staining the grout.)

I’ll continue to work on sharing my progress with you with either project-based posts or monthly recaps!

–
Let’s keep in touch!
Instagram / Facebook / Pinterest / Bloglovin’

Filed Under: Home Tagged With: home, home renovation

Dining Room Inspiration & Planning

August 22, 2018 by jessica Leave a Comment

Dining Room Inspiration

Ginny Macdonald’s dining room makeover has me seriously considering a coat of dark paint.

I spend most days from 5 to 7 a.m. perched in front of the computer with my coffee (always iced). On days you don’t see a blog post, it’s because I’m spending my time scouring the internet to find pieces for our house. Since the house is such a big part of my life and occupies a lot of my free time, I thought I’d share more updates into how things are progressing, starting with a room that has been untouched since we moved in: the dining room. After we painted and had the floors refinished, we put a decades-old table and chairs in the room (a hand-me-down from Dave’s parents) and turned our attention to the rooms we’d use more often, namely the master bedroom and the living room.

The room hadn’t been a priority for three reasons: furniture is expensive, it takes awhile for us to find pieces we both love and agree on, and we were fine using this coffee table as a makeshift dining space. We’re classy people, folks. Not having a proper dining space had been wearing on me, though. I mean, how else do you throw dinner parties like a proper adult if there isn’t a table and chairs for guests? How do I surprise Dave with a romantic meal without a table to set it on? Where do game nights happen? So many things happen in a dining room!

Where We Started

Solid Color Vinyl Photography Background (backdrop roll)

Our dining room shortly after closing on the house in June 2017.

First of all, you can totally give me flak for these grainy, low-light photos. Shoddy “before” pics are one of my least favorite parts of home blogs, but I think it’s mostly because no one wants to spend time photographing a room that sucks much less editing those photos. These were quickly snapped on my phone before we laid down paper and started painting.

To give you some idea of the layout, these were taken while standing in our living room. I love the large archway, which gives the first floor a spacious feeling. To the right, there are three windows that look at our neighbor’s house, so we’ve left the shades there for now to offer privacy while we figure out what we want to do. The doors at the back lead to our deck. And the doorway to the left goes into the [less-than-photogenic, but a project-for-another-time] kitchen. That ceiling fan is just so hideously awful that I can’t believe someone kept it up for so long. (I say that, yet we’ve removed the blades and the shades and have been rocking that look for a year.) The walls were this depressing creamy yellow. I wondered if a chain smoker lived here at some point, but there are areas of paint in various rooms that were true white, so I think it was a design choice. (We painted the room white, for the record.) The red oak floors had their original finish from the 1920s, which is great for future owners because floors can be refinished roughly ten times before too much wood has been sanded away.

And, yes, it will forever drive me nuts that the patio door isn’t centered between those two windows. I’m hope there was a structural reason for it.

Our Inspiration

Dining Room Inspiration

Photos via 1, 2, 3, 4, 5, 6

I honestly don’t know how to categorize our style. Mid-century modern, certainly. A bit of traditional. (I have such a penchant for schoolhouse lights.) Scandinavian. I prefer a more masculine palette that’s heavy on blue, green, grey, and brown — but with brass thrown in for good measure. And, ultimately, we both want our home to feel collected and not like it was plucked out of a showroom at any given time.

I feel like a lot of the rooms in this collage reflect that in some way. When we looked at some of the images that really spoke to us, it was clear that going mid-century modern for the dining room table and chairs would be the perfect way to ground the room, and serve as a jumping off point for both modern and traditional accents. Plus, a statement light fixture is obviously crucial to my future happiness. And that dark paint? Let’s just say I’m very tempted.

The Best Part: Shopping

So, where does that leave us? Well, we purchased our table this week! I also ordered one chair to try with the table to make sure we like it in person before purchasing the others. It’s available at a few different retailers for slightly less, but paying $10 more per chair for easy returns at Home Depot was too tempting to pass up. I originally considered going with these chairs, but I just wasn’t feeling it. (Don’t get me wrong, though, that chair is gorgeous. I have one in our living room.) Below, you’ll find a look at where things are headed — at least in Photoshop. I’m loving how these pieces look together, and I’m crazy about the light fixture (an “inspired-by” version of this). My only hesitation is that it ships from Greece with a $75 shipping charge. It’s an affordable price point for a statement light fixture, but I’m not sure I feel comfortable spending that much sight unseen. If that’s the case or if the dimensions don’t work in our space, we’ll go with something else. We’re also keeping an eye out for a vintage storage cabinet similar to the one below just so that everything isn’t brand new.

Not pictured: white linen curtains and the curtain rod we’ll probably go with to add privacy to that set of three windows.

Dining Room Plan | Bedknobs & Baubles

Sources: Chair | Table | Light Fixture | Lamp | Cabinet | Candle Holder | Prints: Seascape, Brushstrokes | Rug

–
Let’s keep in touch!  Instagram / Facebook / Pinterest / Bloglovin’

Filed Under: Dining Room Tagged With: dining room, home, home decor, home renovation

Recipes: Rhubarb Conserves & Du Bon Pain Blanc

November 13, 2017 by jessica Leave a Comment

Pantry and Palate Cookbook Review & Excerpt

Once it starts getting cold outside, we’re just as content spending time at home cooking as we are heading out to one of our favorite restaurants — and on those coldest days, few things are better than cozying up inside with music playing as we mix up cocktails and try out a new recipe together. I tend to add a new cookbook to our collection each year to keep things fresh, so I was especially excited to receive a review copy of Pantry and Palate last month. Pantry and Palate focuses on the culinary traditions of the Acadians, the descendents of French colonists who settled in Canada’s maritime regions, through journalist Simon Thibault’s exploration of old family recipes, vintage cookbooks, and folk wisdom. “Comfort cooking at its finest” is probably the best way to describe the hearty meals within, but the cookbook is more than that. Thibault’s notations throughout the book share the history and tradition of the region — and the recipes themselves — adding a welcome dose of soul to Pantry and Palate.

I was able to share two recipes from the collection with you: rhubarb conserves and du bon pain blanc (or, “good white bread”). I haven’t made either yet, but I thought you’d love having these on hand for the upcoming holiday season.

Pantry & Palate Cookbook: Rhubarb Conserves Recipe

RECIPE | RHUBARB CONSERVES
Makes 4–6 ( 500ml ) Bottles

From the Author
The initials “BL”were written next to this recipe. I’m not sure who “BL”is, but I would like to thank her very much for this recipe. “Soak overnight 2 quarts rhubarb and sugar,”it asks. There were no instructions for how and when to use the citrus, which is used to add pectin to the preserves. I decided to zest and juice the lemon and orange, and then let them macerate along with the rest of the fruit. I’m glad I did, as the smell in the morning was enough of a pick-me-up that I forgot to make coffee. I put the rhubarb straight into a pot to slowly simmer over a couple hours, reducing and thickening it into a tart/sweet jumble that smelled like a cross between poached rhubarb and marmalade. Midway through the cooking, I had a taste, and I may or may not have done a little dance. A note (or two): The original recipe asks for 1 to 2 quarts of sugar. I only used one, as I found it sweet enough. Once the rhubarb starts cooking down, give it a taste. If you think it can handle a bit more sugar, add a 1/4 cup or so, until it gets to the taste you’re looking for. And even though it’s not traditional, a vanilla bean that has been split in half and scraped of its seeds never hurt anyone. When it comes to the citrus fruits, you may want to place them in cheesecloth before you add them into the pot for cooking. It makes it easier if you wish to remove them from the preserves. I keep mine in as I like the slightly bitter taste I get from them.

Ingredients

  • 2 pounds rhubarb, washed and rinsed
  • 1 lemon
  • 2 oranges
  • 1 pound sugar

Instructions

  • Cut the rhubarb into 1-inch pieces. Place in a large bowl.
  • Wash the oranges under warm water, and pat dry. Zest the citrus directly into the bowl with the rhubarb.
  • Cut the oranges and lemon in half, and juice them, adding the juice to the rhubarb.
  • Add the sugar and the spent citrus halves, and stir well. Place in fridge.and allow to macerate overnight.
  • The next day place the ingredients from the bowl into a large pot, and turn the heat to medium-low. You will want to bring the rhubarb up to a gentle simmer, making sure to stir often so as not to scorch the sugar or the fruit. Make sure to skim off any scum that rises to the surface.
  • Once it’s been brought up to a simmer, reduce the heat to medium-low,and stir every 8–10 minutes or so. This helps reduce the amount of liquid, as well as any possible chances of scorching.
  • Keep cooking until the rhubarb thickens and reduces slightly, about 90 minutes or so. If you find yourself worrying about it scorching, simply reduce the heat further. It won’t hurt, and if anything will allow the liquid to reduce and the flavour to improve.
  • Remove the orange and lemon segments if desired and pour the contents into a container.
  • Serve on toast, over ice cream, with yogurt, or whatever your heart desires.

Pantry & Palate Cookbook: Du Bon Pain Blanc Recipe

RECIPE | DU BON PAIN BLANC/GOOD WHITE BREAD
Makes 1 Loaf

From the Author
“Du bon pain blanc” is the headnote I find in Rosalie’s notebook. This bread recipe is one of the few that asks for packages of yeast, something that would have been relatively new for a baker of her era. All of her other recipes called for cakes of yeast, which were much more common at the time. The recipe also calls for milk, buttermilk, and sugar, which would enrich the bread’s flavour and extend its shelf life. This enriched white bread reminds me slightly of an eggless challah, or even French pain au lait. It’s a great white bread to eat on its own, as toast, and, perhaps best of all, cut into slices and left out to dry overnight for pain perdu, also known as French toast.

Ingredients

  • 1 1/2 cups milk
  • 1/2 cup buttermilk
  • 2 tablespoons sugar
  • 2 tablespoons shortening
  • 2 1/2 teaspoons yeast
  • 1/2 cup water, room temperature
  • 1 teaspoon salt
  • 6 cups flour, sifted

Instructions

  • In a saucepan, warm the milk and buttermilk to a gentle simmer.
  • Remove the milk from the heat and add the sugar and shortening. Stir to dissolve the sugar.
  • Dissolve the yeast in the room-temperature water.
  • Add 1 cup of flour into the milk mixture and blend to make a smooth batter.
  • Add the salt and yeast water to the batter, and mix thoroughly.
  • Add rest of flour, 1 cup at a time, until the dough forms a ball and unsticks from the sides of the bowl.
  • With flour-dusted hands, gather the dough into a large ball, and begin to knead the dough on a well-floured surface, adding flour as you go.
  • Place the dough in a clean bowl, cover it, and allow it to rest until doubled in size, about 1 1/2 to 2 hours.
  • Remove the dough from the bowl. Place on a well-floured surface and knead briefly.
  • Roll the dough into a log, and place in a greased and floured loaf pan.
  • Cover, and allow to rise for 1 hour.
  • Preheat your oven to 400̊ F. Place the bread into the oven and bake for 1 hour.
  • Remove the bread from the oven and remove from pans. The bread should sound hollow when tapped on the bottom. If not, return to oven for 10 minutes.
  • Allow the bread to cool for at least 1 hour before cutting into it.

Pantry and Palate Cookbook Review & Excerpt

Pantry and Palate by Simon Thibault | Target runner (the print is also available in placemats) | Target bowls | Target serving board (similar here and here) | Saint Linen towels

***

Excerpted from Pantry and Palate by Simon Thibault © 2017, Recipe text by Simon Thibault. ©2017, Recipe photographs by Noah Fecks. All rights reserved. Published by Nimbus Publishing


Filed Under: Home, Recipe Tagged With: cookbook, fall recipes, home, recipes, Target Project 62, winter recipes

15 Pineapple Pieces for Summer

May 17, 2017 by jessica 3 Comments

 orange backdrops

A couple of weeks ago, I joked that the “Weekly Reading” posts always have at least one pineapple item to love. What can I say? I’m kind of obsessed with that perky tropical fruit!* One of my favorite pieces in my collection is this tiny pineapple pendant by Lee Renee that Dave gave me for my birthday two years ago (worn recently here). It’s the perfect pint-sized pineapple for everyday wear. And my penchant for pineapples isn’t waning even though I already have the necklace, the matching ring, and an assortment of vintage brass pineapples around the house! Here are 15 pineapple pieces I love for summer:

  1. J.Crew’s latest collaboration with Ratti has resulted in two fantastic pineapple print fabrics. I could fill this list with items just from that collection, but I’ll refrain and draw your attention to the one I love most: this tie-shoulder dress.
  2. These pineapple shot glasses are just the cutest things. I own a set and use them as decorations.
  3. Bring pineapples the office by way of a shift dress.
  4. An eBay search for “vintage pineapple ice bucket” will yield brass Hollywood Regency style pineapples. Some will need TLC, but it shouldn’t be anything brass polish can’t handle.
  5. If you really love pineapples, consider splurging on this bag. The perforated design is perfectly subtle.
  6. And, if your budget is more modest, here’s a straw clutch that won’t break the bank.
  7. You know I’m a Lele Sadoughi fan girl and her sculptural pineapple earrings don’t disappoint.
  8. I can’t get over this set of brass bookends.
  9. Tassels adorn this scarf, which has a great tonal print. The larger version works as a sarong.
  10. This breezy maxi is perfect for steamy summer days.
  11. Love my necklace featured above, but would prefer a more affordable alternative? Try this.
  12. This pineapple print makes me so happy.
  13. Pineapple-embossed glassware makes cocktail hour both chic and cheeky.
  14. A pair of espadrilles is guaranteed to make you smile when embellished with a pineapple and a palm tree.
  15. Give your bathroom a summery makeover with this shower curtain.

*Never on a pizza, though.

Filed Under: Style Tagged With: home, jewelry, lee renee pineapple pendant, pineapple

Review: Instantly Framed

December 4, 2014 by jessica 1 Comment

InstantlyFramed-5

[dropcap custom_class=”normal”]I[/dropcap] have tons of digital images that I’d love to get printed and framed, but the fact of the matter is I’m too lazy to put in the effort. This is precisely why I’m a huge fan of Instantly Framed, a new app that allows you to upload a digital photo and have it printed and framed within a week. Best of all? It’s only $65 and that includes three-day shipping. (There’s even a $10 discount at the end of this post for you.) I was given the opportunity to try out the service a couple of weeks ago and it’s just as seamless as I had hoped and the final product is outstanding.

[spacer]

InstantlyFramed-1

After installing the app, the first step of the process is really the most difficult: choosing a photo. You have the opportunity to select an image from your photo album, Instagram, or Facebook. You can also take a photo on the fly if you’re confident enough with your photo skills. I knew right away that I wanted to frame an Instagram from our trip to Belgium and I debated between this one, this one, and this one.

[spacer]

InstantlyFramed-4

Of those three, I went with the third option: a snapshot from a morning at Moeder Lambic. We spent almost every morning at the restaurant, getting a leisurely start to the day with beer and quiche. This little snapshot brings back those happy memories each time I look at it. While I could have uploaded the image right from Instagram, I opted to tweak the colors just a bit in VSCOcam first.

[spacer]

InstantlyFramed-2.v2jpg

After the hard part is done, all you need to do is import the photo and select your image size. I liked the artsy 4″ x 4″ version, but I thought it might be too small for all the detail in my image and opted for the 6″ x 6″.  All frames are 12″ x 12″ and come from wood forested on an FSC-certified tree farm in Ashland, Wis. (my hometown!). Each walnut frame is hand crafted with a black finish that emphasizes the wood grain. There is a thick cardboard backing on the frame that is made out of recycled materials. You have the option of either hanging your new image or using the easel backing.

[spacer]

InstantlyFramed-3

And with that, you’re ready to check out. The photo takes a couple of days to print then it’s sent to you with free three-day shipping. The entire process takes about a week, so you still have plenty of time to consider an Instantly Framed photo for holiday giving. (You could earn major Brownie points with mom by scanning an old photo of you and your siblings and having that framed.) Order by Monday, Dec. 15 to save $10 on each order.

DISCOUNT CODE:
CIBEDKNOBS10

I know the photo in the first image isn’t the best (daylight savings time is still screwing my photo schedule, leading to some overexposed shots to compensate for the darkness), but it’s quite pretty in person. I’m considering having a few more snapshots framed to create a gallery wall of our special mini moments on vacation.

[spacer]

[spacer]

Disclosure: I received a framed photo from Instantly Framed for the purposes of this post. This does not influence my opinions of the company or the product. As always, thank you for supporting the brands that support Bedknobs & Baubles.

Filed Under: Gift Guide, Home Tagged With: gift guide, home

  • 1
  • 2
  • 3
  • …
  • 10
  • Next Page »

Hello!


Jessica Hamm
Hello there! I'm a first-time homeowner updating a 1920s house in Madison, Wisconsin. I have a penchant for travel and a love of costume jewelry.

Keep In Touch

  • Bloglovin
  • Email
  • Facebook
  • Instagram
  • Pinterest
  • Twitter

Search

Latest Home Finds

Visit Me on Instagram!

I’m challenging myself to get through a backlog I’m challenging myself to get through a backlog of travel photos before we book our next trip. First up, photos of the gothic York Minster. I’m not religious in the slightest but I can’t resist stunning architecture and the opportunity to climb hundreds of cathedral stairs for a city view. This one only had a single rest stop about halfway up the flight of 275 steps for a closeup view of the flying buttresses — and a waiver you had to sign before your ascent to promise you’re healthy enough to make it.
Can you hear meow? 😸 Lily is putting the phone Can you hear meow? 😸 Lily is putting the phone nook to good use.
Christmassy mornings. Christmassy mornings.
Thanksgiving Bake: Flourless Chocolate Wave Cake f Thanksgiving Bake: Flourless Chocolate Wave Cake from Dessert Person by @csaffitz

#dessertperson #thanksgiving #eastfork #eastforkdoesmydishes #eastforkpottery #dansk #food52 #dessert
Visiting York earlier this month put us in the Hal Visiting York earlier this month put us in the Halloween spirit. While it claims to be the most haunted place in Europe and is dubbed the city of a thousand ghosts, we only encountered the wire-mesh sculptures of Ghosts in the Gardens (@the_york_bid) and the family of souvenir ghosts I brought home from @yorkghostmerchants. 

#ghostsinthegardens #york #hauntedyork #yorkmuseumgardens #yorkghostmerchants
Instagram post 18062569012742534 Instagram post 18062569012742534
Load More... Follow on Instagram

Copyright © 2025 · Jennifer on Genesis Framework · WordPress · Log in